PRICAT import rules
- 09 Jul 2024
- 6 Minutes to read
- Contributors

- Print
- DarkLight
- PDF
PRICAT import rules
- Updated on 09 Jul 2024
- 6 Minutes to read
- Contributors
- Print
- DarkLight
- PDF
Article summary
Did you find this summary helpful?
Thank you for your feedback
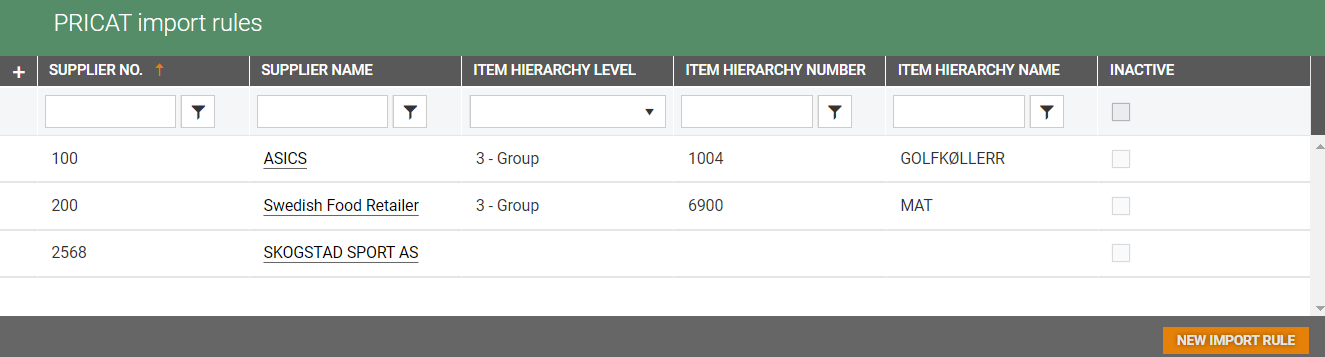
PRICAT import rules displays an overview of the PRICAT import rules. Here you can view/edit and deactivate existing PRICAT import rules and create new ones.
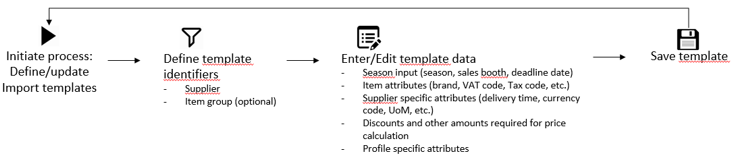
PRICAT import rules are used to edit the item information of items imported from Item import. The PRICAT import rule will apply to the specified supplier and optionally to the defined item group.
The item information defined in the import rule is what will apply when an item is imported. If a field contains information from both the supplier and the import rule, the import rule will take precedence.
Create new import rule
To create a new import rule, click on the New import rule button. The “New import rule” dialog opens. Mandatory fields are marked with *.

Supplier – Select a supplier.
Item hierarchy level – You can choose from department, item area, item group or blank. The selection you make determines whether a new field is displayed where you can specify either a department, an item area, or an item group. If you have selected blank or have not specified the item hierarchy level, no additional field is displayed.
Planning code – Select a planning code. This is a mandatory field.
Tick the profiles that will use the import rule.
Click on Create to create a new import rule.
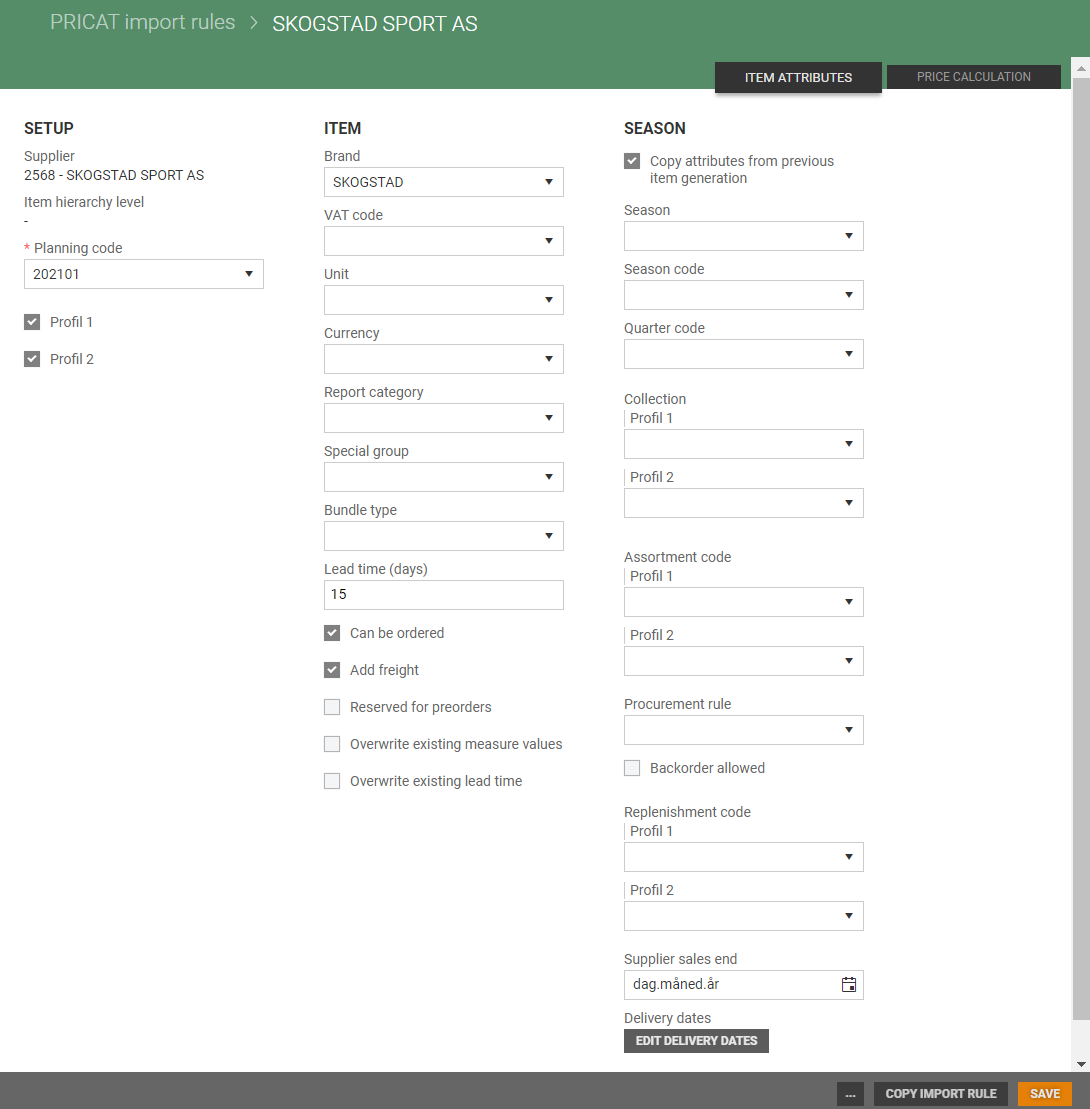
The PRICAT import rules screen opens and has two tabs: "Item attributes" and "Price calculations".
.png "image(61).png")
Item attributes
The Item attributes tab is divided into categories containing various fields which can be completed to specify the pre-set values for the import rule. You select which fields are to be completed.
Description of fields for Item attributes
SETUP
Supplier: Displays the supplier for which the import rule applies (cannot be changed).
Item hierarchy level: Displays the item hierarchy level for the import rule (cannot be changed).
Planning code: Select a planning code; displays the selected planning code.
Profiles: Tick the profiles the import rule applies to.
ITEM
Brand: Select a brand.
VAT code: Select a VAT code.
Unit: Select a unit.
Currency: Select a currency.
Report category: Select a report category.
Special group: Select a special group.
Bundle type: Select a bundle group.
Lead time (days): Number of days’ lead time. The total time it takes from the item being ordered to the item being delivered.
Can be ordered: Tick to indicate that the item can be ordered.
Add freight: Tick to indicate that freight costs are to be added for the item.
Reserved for preorders: Tick to indicate that the item is reserved for preorders. This means that the available stock should be reduced by the quantities reserved in preorders.
Overwrite existing size and weight values: Tick to indicate that the existing size and weight values are to be overwritten.
Overwrite existing lead time: Tick to indicate that the existing lead time is to be overwritten.
SEASON
Copy attributes from previous item generation: Tick to indicate that the attributes from the previous item generation are to be copied.
NB! The values in the following fields are copied from the previous item generation: Season code, Quarter, Procurement rule, Auto replenishment, Backorder allowed, Replenishment code, Service level, Base assortment, Assortment code, Marketing code, and All seasons.
The value in the Season field is NOT copied; the value in the Season field from the Import rule is displayed for the item.
Season: Select a season.
Season code: Select a season code.
Quarter: Select a quarter.
Collection: Choose a collection for each profile. There is one field for each profile.
Assortment code: Select an assortment code for each profile. There is one field for each profile.
Procurement rule: Select a procurement rule.
Backorder allowed: Tick to indicate that backorders are allowed.
Replenishment code: You can select a replenishment code for each profile here. There is one field for each profile.
Sales end: Date that sales end; enter a date or select one using the “calendar” icon.
Delivery dates
Before clicking on the Edit delivery dates button, you must save any changes you have made by clicking on the button marked Save.
Click on the Edit delivery dates button to edit the delivery dates.
If you click on the button before saving your changes, a dialog is displayed asking if you want to save your changes. You can choose to discard your changes, cancel, or save.
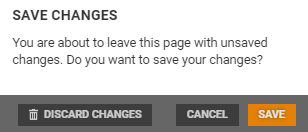
If you select Discard changes or Save, the “Add delivery date” screen is displayed.
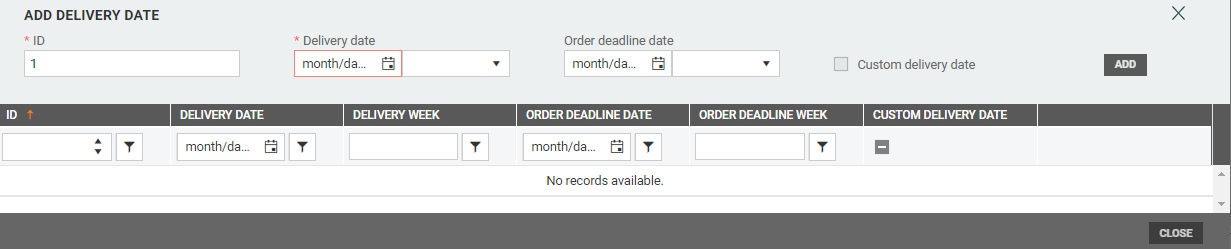
Enter an ID. The next available ID is suggested.
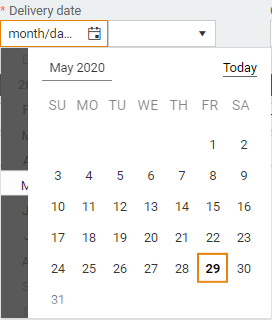
Select a Delivery date (mandatory) – You can select the delivery date by clicking on the “calendar” icon and selecting a delivery date.
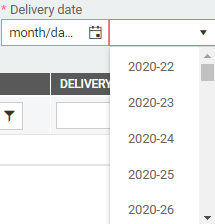
You can also select a delivery date by choosing a week from the drop-down list. This sets the delivery date to a date in the selected week.
Select an Order deadline date (optional) – The order deadline date is set in the same way as the delivery date.
Custom delivery date – You can tick the box next to “Custom delivery date”. This will grey out the “Delivery date” and “Order deadline date” fields.
Click on Add to add the delivery date.
You can add multiple delivery dates.
Click on Close to close the screen.
The delivery dates will be added to the item details screen. You can edit the delivery dates by clicking on the button marked Edit delivery date.
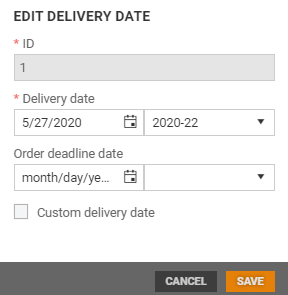
Edit delivery date
You can edit delivery date entries in the table.
Select the relevant delivery date and click on the “pencil” icon.
The “Edit delivery date” dialog opens. Edit the delivery date and click on Save.
Delete delivery date
To delete a delivery date, select the relevant delivery date and click on the “bin” icon. The delivery date will be deleted.
Copy import rule
You can use the “Copy import rule” function to copy an import rule.
The “Copy import rule” dialog opens, containing the information from the import rule you have copied.
Tick the profiles you want to use with the import rule.
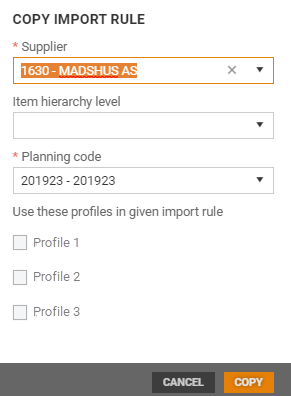
Click on Copy to copy the Import rule.
The import rule you save cannot be identical to another and in this case a message will be displayed to inform you that this combination already exists. You will need to change one of the conditions.
Deactivate import rule
You can deactivate an import rule by clicking on the “more” button and selecting Deactivate.
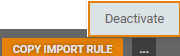
This will deactivate the import rule. Deactivated import rules cannot be used in an item import. “Inactive item import rule” is displayed at the top of the screen.

You can reactivate the import rule by selecting the “more” button again and selecting Activate.
Price calculation
The Price Calculation tab contains some of the elements used in the price calculation.
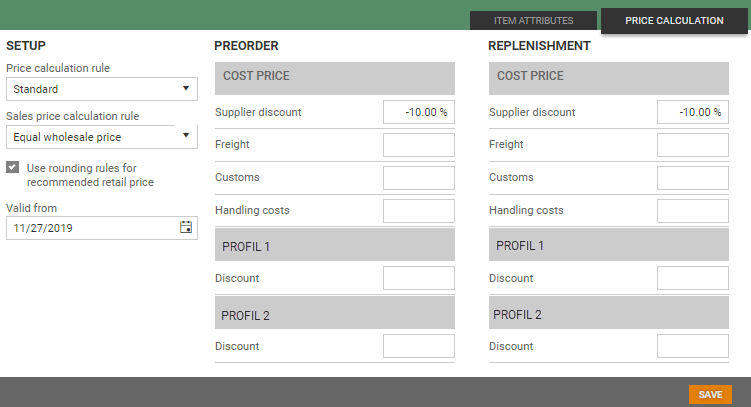
Description of fields for Price calculation
SETUP
Price calculation rule: Select a price calculation rule.
Sales price rule: Select a sales price rule. There are 3 options available:
Equal wholesale price – The sales price should be equal to the wholesale price (purchase price).
Preorder margin – The sales price is calculated based on the wholesale price plus gross profit
Recommended retail price factor – The sales price is calculated based on the suggested retail price divided by a specific factor
Use rounding rules for recommended retail price: Tick if you want to apply the rounding rules for the recommended retail price.
Valid from: You can enter the date that the price is valid from here. Type in a date or use the “calendar” icon to select a date.
PREORDER
Supplier discount: Enter the supplier discount, specified as a %.
Freight: Enter the freight costs to be added, specified as a %.
Customs: Enter the customs duties to be added, specified as a %.
Handling costs: Enter the handling costs to be added, specified as a %.
Discount: Specify the discount for each profile as a %.
REPLENISHMENT
Supplier discount: Enter the supplier discount, specified as a %.
Freight: Enter the freight costs to be added, specified as a %.
Customs: Enter the customs duties to be added, specified as a %.
Handling costs: Enter the handling costs to be added, specified as a %.
Discount: Specify the discount for each profile as a %.
Click on Save to save your changes.
Was this article helpful?