On the Details tab, you can view and edit details/information about the item. The fields displayed on the screen are grouped into categories of related fields.
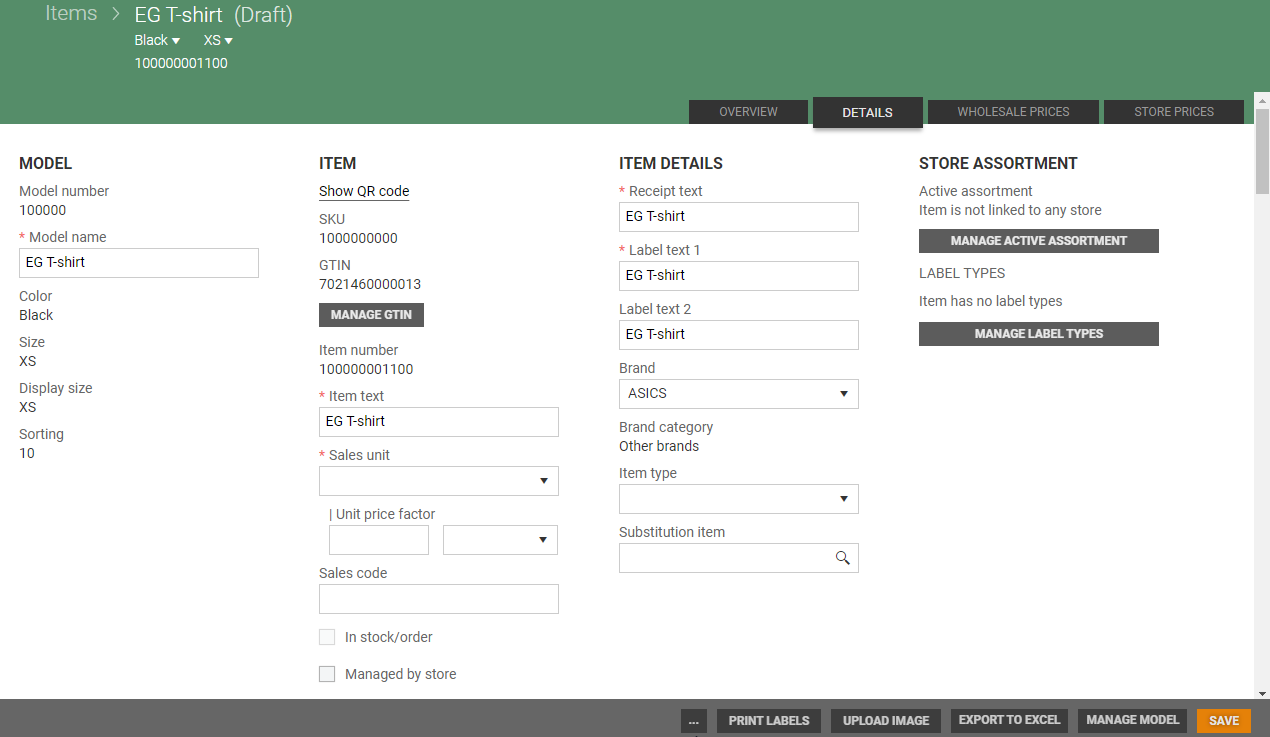
The overview displays the available fields for the item and there are several types of fields. The fields displayed depend on whether the item has a variant or not. Required fields is marked with a *.
MODEL
The fields displayed in the model category depend on whether the item has variants or not.
Model number: The model number of the item. Identifies a group of items with common attributes (color/size). This value cannot be changed.
ModelModelNoSequence = start value xxxxx (default 100000), increment by 1, min value -9223372036854775808, max value 999999
Model name: Model name; can be changed manually and independently of item text.
Color: Model name; can be changed manually and independently of item text.
Size: Size text: usually the same size as used by the supplier.
Display size: Display size: the size used for consumers, in a web shop for example.
Sorting: Sorting numbers are used to sort sizes within the variant.
ITEM
Show QR code / Hide QR code: Click on the link "Show QR code", a QR code is shown. The link changes to "Hide QR code". You can click on the link to hide the QR code.
SKU: SKU=Stock Keeping Unit, generated unique ID.
Configuration: ItemSKUSequence = start value xxxxx (default 1000000000, increment by 1, min value -9223372036854775807, max value 9223372036854775807
GTIN: Configuration: ItemGTINSequence = start value xxxxx, increment by 1, min value 1, max value 999 999.
Product ID: Product ID – Item identifier on the item from 3rd party.
Item text: Item text; can be changed.
Item number: Item number: generated by default as the model number plus 3 digits for the color (first color starts at 001) plus 3 digits for the size (first size starts at 100), giving a total of 12 digits. Automatic generation must be disabled if a different system determines the item number.
Configuration: ItemColorNumberSequence = xxxxx, increment by 1, min value -9223372036854775808, max value 9223372036854775807.
Sales unit: The sales unit for the item. The sales unit can be changed by selecting from the drop-down list.
Unit price factor: You can select a unit from the drop-down list and enter quantity of the selected unit. When both quantity and unit are selected "Price per unit" field appears. It shows price per unit, which is the sales price of item divided by unit price factor. Only units with "Unit price factor" flag set True can be selected there. There is also a field to enter quantity of selected unit in this item. When both quantity and unit are selected, "Price per unit" field appears. It shows price per unit, which is sales price of item divided by unit price factor. Price used for calculation is active Profile price, and when not available, team price followed by the store price.
Sales code: Specify sales code. Sales code used when different items represent the same item from a customer perspective.
In stock/order: Indicates whether the item is an active stock item. This field is updated only via API from the master stock system. The value is set to True if the item is physically in stock or is in a purchase order sent to the supplier or in a customer order.
Local item
Tick to indicate whether the item can be managed by a store. The flag can be changed by the user or will be set to True if user has “Manage local items” permission with proper store access and at the same time does not have 'Create New Item' permission.
A user with Manage local items permission can only create local items (Local item flag set to True (ticked)).
Editing an item
Item with 'Local item' flag set to True and without any price can be modified by:
User with Manage local items permission.
User with Update existing items permission.
Item with “Local item” flag set to True and with price for store or store group can be modified by:
User with Manage local items permission for the given store or store group.
User with Update existing items permission.
Item with 'Local item' flag set to False and without any price can be modified by:
User with Update existing items permission.
Creating new prices or Editing existing future prices
Price for item with 'Local item' flag set to True and without any price, can be created by:
User with Manage local items permission.
User with Create new price/Edit existing price permission.
Price for item with 'Local item' flag set to True and with price for store X can be created/modified by:
User with Manage local items permission for the given store.
User with Create new price/Edit existing price permission.
Price for item with 'Local item' flag set to False and without any price can be created by:
User with Create new price/Edit existing price permission
ITEM DETAILS
Receipt text: Text used on the receipt. You can change this by entering a new receipt text.
Label text 1: Text that can be printed on a label/poster. You can change this by entering new label text 1.
Label text 2: Text that can be printed on a label/poster. You can change this by entering new label text 2.
Brand: Text that can be printed on a label/poster. You can change this by entering new label text 2.
Brand category: Displays the item's brand category, it is linked to the brand.
Item type: You can change the item type by selecting one from the drop-down list.
Substitution item: Displays any substitution item. You can enter a substitution item using the search function.
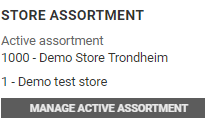
STORE ASSORTMENT
Active assortment
The store assortment displays stores with an active assortment when it is configured.
A store is automatically included in the active assortment when a price is set for that specific store. However, when a price is established for a profile or price zone, the store must be manually added to the active assortment.
Stores can be added both individually and collectively. Only those stores where the item is priced will appear in the active assortment.
Manage active assortment
Access is restricted by the view/manage store local attributes permissions. A user with "View" permission can only view stores that he has permission to. The same situation with 'Manage' permission.
Click on the Manage active assortment button to manage active assortment. The "Manage active assortment" page open. What you can do on the page is depending on your permissions. Here you can add stores manually to the active assortment, and you get an overview of the stores with active assortment.
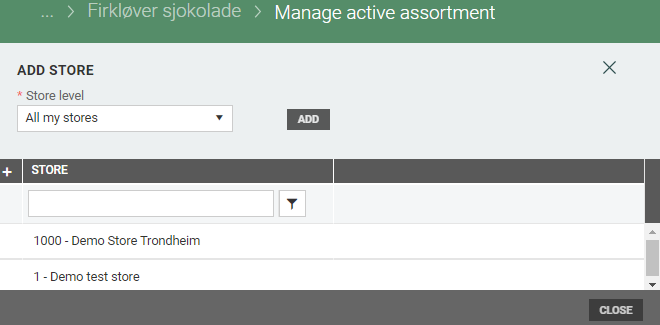
Add store to active assortment
Select Store level - “All my stores” or “Store”. If you select store level “Store” you must select a store.
Click on the Add button to add the store to the active assortment

Delete stores from active assortment
Click on the store you want to delete. A “Bin-icon” appears at the right on the line.
Click on the “Bin-icon”. The selected store is deleted from the active assortment.

If the store has pending labels they will be removed, even if the link from scale still exists.
Close the manage active assortment page
Click on the close button to close the page and save changes
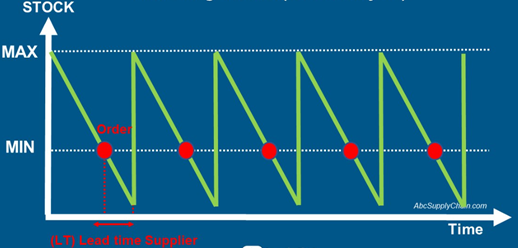
Order point
Order points for an item are displayed in the 'Order Point' section.
Active order points appear in the 'Active Assortment' grid, where only the order points that are currently active are visible.
You can view the minimum and maximum order point values for a specific store. However, if an order point applies to all stores, that order point will be displayed.
If no order points are defined for an item, the message "Item has no order points" will be displayed.
Order point - business rules
When available stock quantity is below or equals to the min value the proposed order quantity should be the difference between available stock quantity and the max value.
The formula above is also valid If only one value exists (Max value = Min Value), but a proposed quantity would then only be generated when available stock qty is below the Min value. (Order in progress, status > draft, should be included in available stock quantity).
This picture visualize the concept of min/max replenishment with lead time included (the time it takes from the order proposal is generated and sent to the actual delivery from the supplier).
The Min value must be set to a value that minimize out of stock scenario.
Manage order points
Click on the Manage order point button to manage order points for the item. The "Manage order points" page opens. You can add new order points, edit, and delete values from the order point table.
Adding and managing order points is depending on the user's permission.
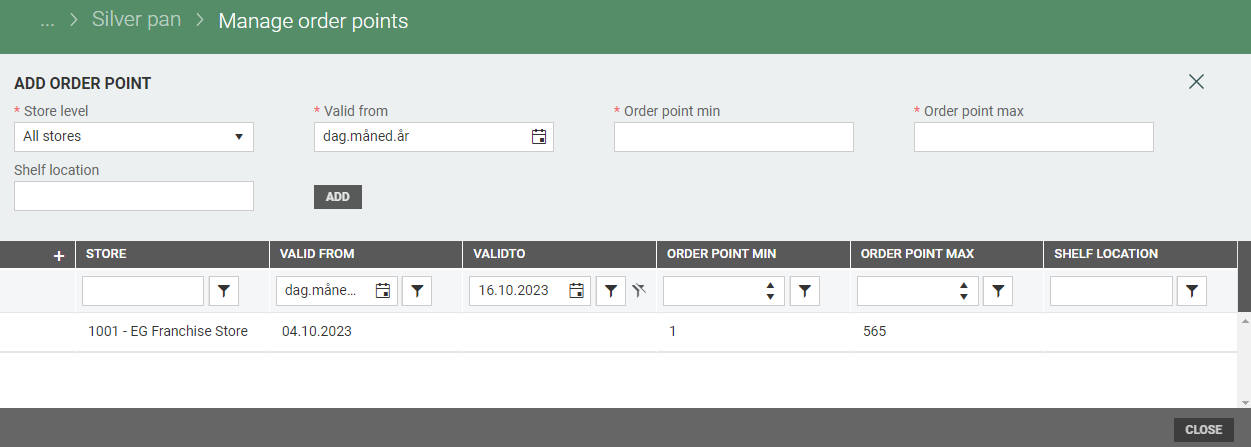
Add order point
Select "Store level". You have two options: All stores (default) or Store. If you select Store the "Store" field opens. Select relevant store. The rest of the fields are the same for both store level options.
Select "Valid from", "Order point min", "Order point max" and "Shelf location" (optional).
Click on the Add button to add order point.

It is possible to create future order points. Order point min value must be less than or equal to order point max.
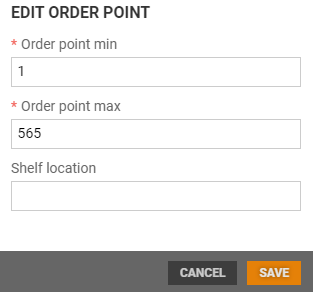
Edit order point
Existing order points can be edited. Click on the "pencil-icon" on the order point you want to edit.

The "Edit order point" dialog opens. You can change Order point min, Order point max and Shelf location. Click on Save, to save changes.
Delete order point
Existing order points can be deleted. Click on the order point you want to delete. A "Bin-icon" appears at the left on the line. Click on the "Bin-icon", the selected order point is deleted from the item.

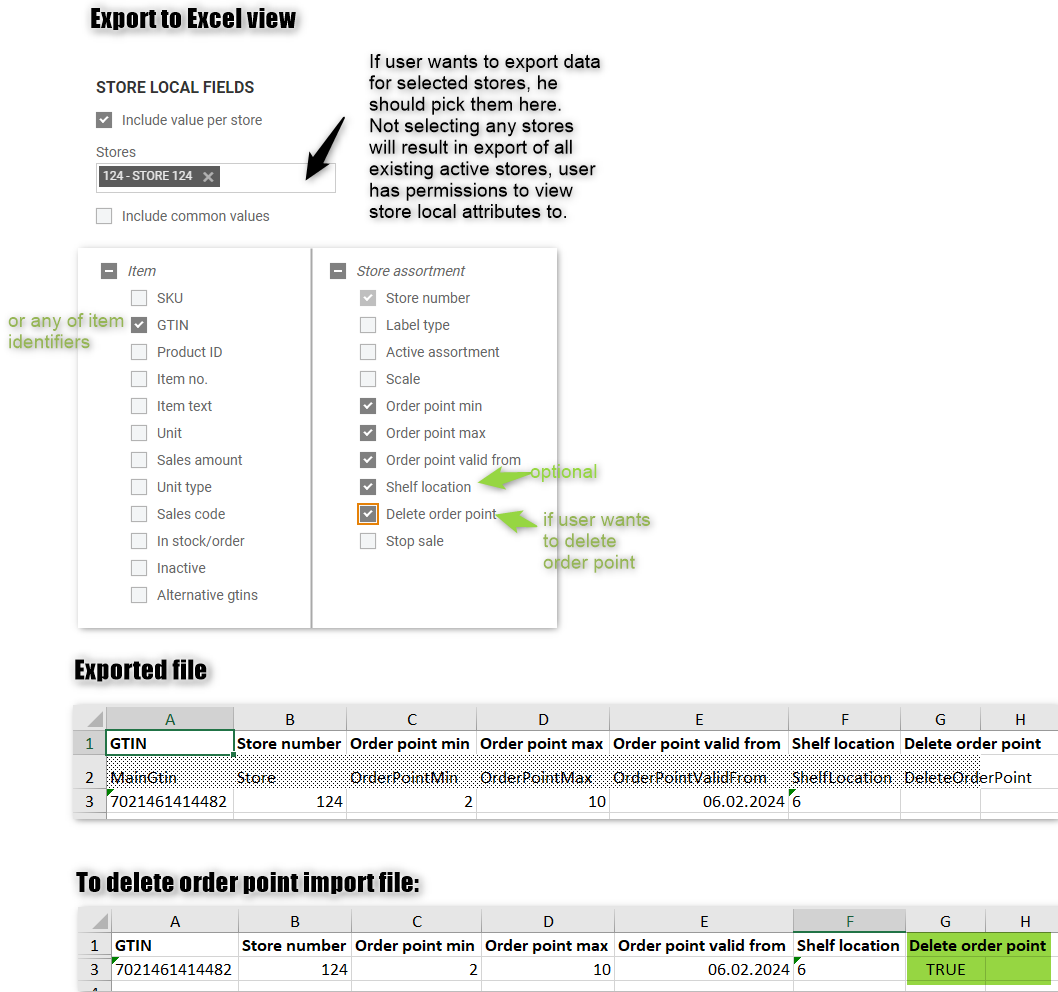
Excel import and deleting of order points
Order points can be imported for selected ‘Stores’ or for ‘All stores’ level. When importing store local values, you should NOT include import of prices in the same Excel file.
File should contain item identifier (GTIN, SKU, etc.), store number - which normally should have machine header 'Store' hidden, order point min, order point max and order point valid from.
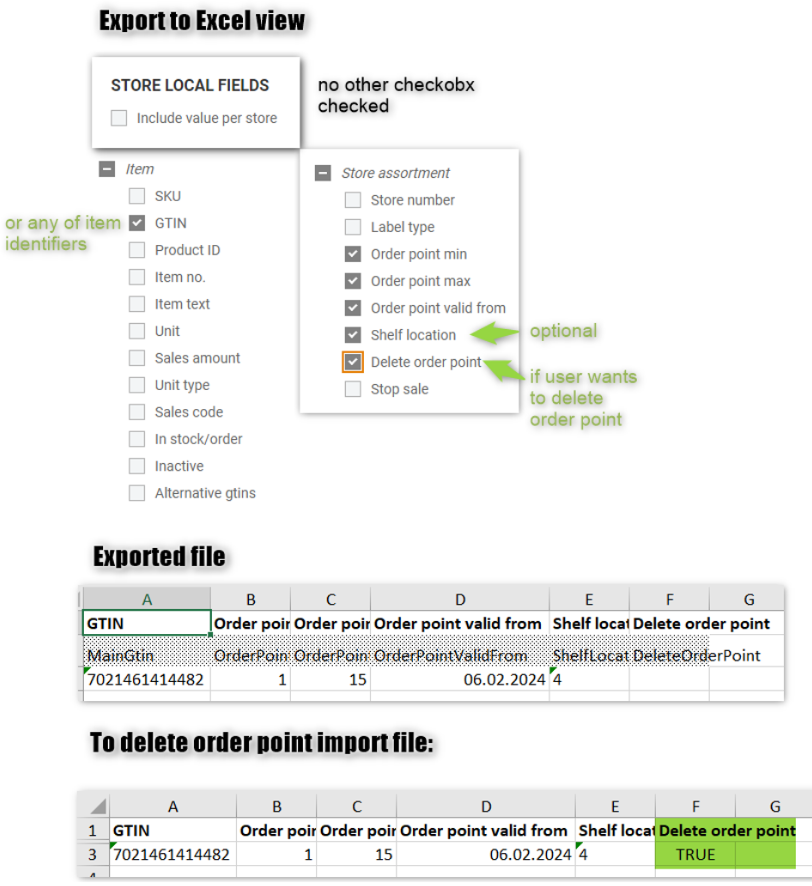
For import of order points for 'All stores' level, there are needed fields as in previous example, excluding store number.
To delete order point, include the 'Delete order point' flag set to TRUE.
Examples:
For selected stores:
For All stores:
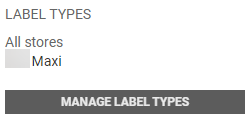
Label types
Label types shows label types defined for the item, and if the label is defined for all stores or to specific stores.
"Item has no label types" is displayed if no label types are defined for the item.
If there are more than five stores, only top five are shown. Label types on 'All stores' level are shown first. There is a button underneath them, which takes the user to another view with list of label types per store.
Manage label types
Access to View/Manage label types are depending on the user's permissions. If the user does not have access to Manage label types, the manage label type button is hidden.
Click on the Manage label types button to configure label types for the item. Label type page opens.
Here you add new label types for the item, and it have a table showing the existing label types, and the stores defined for the label types.
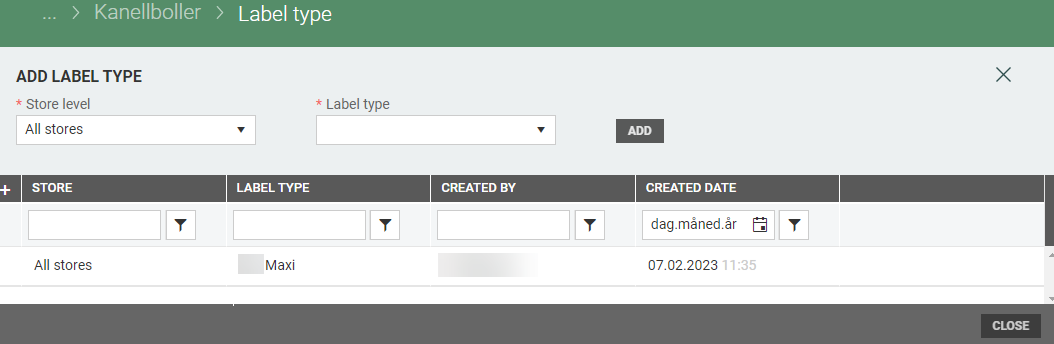
Add label
Select "Store level". You have two options: All stores (default) or Store. If you select Store the "Store" field opens. Select relevant store and select "Label type". Click on the Add button to add the label type.

If you want to add the label to "All stores" you only must select "Label type" and click on the Add button.

When a label type is added to the item (common or store), new labels (including current and future) are automatically created.
Avoid generating labels for specific items and specific stores
If you want to avoid generating labels for specific items and specific stores you can add Label type “None” to the store. Then no labels are created for it. If you use None as label type it can be the only label type for that store.
Delete label
Existing label types can be deleted. Click on the label you want to delete. A "Bin-icon" appears at the right on the line. Click on the "Bin-icon", the selected label type is deleted from the item.

When a label type is removed from an item (common or store), all future labels (of the selected label type) are removed.
LIMIT CONTROL GROUP
The limit control groups section displays limit control groups configured for the item.

Click on the Manage Limit control groups button to manage limit control groups for the item. The "Manage limit control groups" page open. You can add limit control groups for the item, and add, and delete limit control groups from the limit control groups table.

Add item limit control group
Select Limit control group from drop-down list, enter Amount and Content item name. When you add the first group via the user interface the "Content item name" is prefilled.

Click on Add to add the limit control group to the item.
An item can have same limit group assigned multiple times.
When an item is a model item, then user can specify for which items from the model he wants to assign the limit control group.
Edit item limit control group
Click on the relevant Limit control group and click on the "pencil icon" to the left.

The "Edit item limit control group" dialog open. Amount and Content item name can be edited. Click on Save, to save changes.

Delete limit control group
Existing limit control groups can be deleted. Click on the limit control group you want to delete and click on the "more-button" to the left and select "Delete".

The "Delete item limit control group" dialog open. Warning you about that you are about to delete the Limit control group. Click on to Delete it.

SUPPLIER ITEM DETAILS
Supplier: The main supplier of the item.
NB! The supplier must be selected before you can edit the other supplier fields.
Supplier item no.: The item’s supplier item number (not usually used if the supplier model number is used). Supplier model no.: The item’s supplier model number.
Supplier color: The item’s supplier color.
Supplier color code: The supplier’s color code for the item.
Supplier size: The item’s supplier size.
Lead time (days): Number of days’ lead time. The total time it takes from the item being ordered to the item being delivered.
Edit suppliers An item can have several alternative suppliers and there may be different main suppliers for different stores. You can edit the suppliers by clicking on the Edit suppliers button. This opens the “Item suppliers” screen.

You can add a supplier by entering the supplier details at the top of the screen and clicking on Add to add the supplier.
You can also edit suppliers. Select the line for the relevant supplier and click on the “pencil” icon.
Edit the supplier and click on Update to update your changes.
CHANGE HISTORY
Displays information about the date the last change was made when the item was created and who changed/created the item.
PRICE
VAT code: Displays the item’s VAT code. Select the VAT code from the drop-down list.
Default margin (%): The price default margin in %. When you create a first price, this will be default value for the margin. Either when creating the price from UI or when importing it (and the file has only wholesale price).
Open price: Tick to indicate that the item should have an open price for cash register sales or customer orders. If the item has an open price, the cashier must enter the price manually each time it is sold at a cash register.
Fixed price: Fixed price can be set on model/item and on store prices. Tick to indicate that item should have fixed price. It will be applied to the prices created in the future, not to the existing ones. It can be overridden on the price level, when creating store price. When creating new store price, default value of "Fixed price" is taken from model or from active store price (active store price is more important).
Customer discount: Tick to indicate that a customer discount can be offered on the item.
Concession: Tick to indicate that the item is to be marked as a concession item.
Change VAT: Tick to indicate that the item can have different VAT rates, based on whether the item is eaten inside the store, or as take away.
Exclude from price control: If you tick this (set to TRUE), then price suggestions for franchise stores and for retail price for profiles are not created. By default it is False (not ticked). It can be exported (both Excel and Gateway.ItemChanges) and imported (mass update and JSON contract).
SALES
Deposit item: Displays deposit item if a deposit item is linked to the item. You can search for an item and add a link to the item. After selecting an item, the item name is displayed and a link to the Quantity field appears, default value is 1 and can be edited.
Nonsale type: You can select nonesale type from the drop-down list.
Active substance: You can select active substance for the item from the drop-down list.
Warrant type: Select a warranty type from the drop-down list.
ID requirement: Select ID requirement from the drop-down list.
Treatment type: Select a special treatment from the drop-down list if the item has some special handling.
Serial number is required on sale: Tick to indicate that a serial number is required when the item is sold. This applies to the sale of weapons, for example.
Update in POS: The "Update in POS field is by default set to True (is ticked) on items with at least one store price. It means that the item is ready for sale.
If the item is set to False, the item will be deleted in POS.
If the item does not have any store prices, the item has status Draft.
Items with status draft have status False in the "Update in POS" field, and the value in the field cannot be changed.
The "Update in POS" field can be Imported and Exported.
Alarm item: Tick this if the item is an item with special security (anti-theft) tag. Mainly used so that store staff is notified and can detach the tag in self-service cash registers.
Stop sale: This is used for stopping sale of items that are not good (for example Salmonella in food). If you want to stop sale of an item you must tick the Stop sale field (set it to True), you get a mandatory field "Reason code". You must add a reason code. Items with the Stop flag checked gets status "Stopped".
.png "image(22).png")
This field is disabled for “Draft” items.
Exclude from gross profit report: Tick to mark the items that usually have wrong gross profit, so they can be excluded from sales report.
Can be sold: Ticked by default, indicated whether an item can be sold or is blocked from sale.
Bonus: Tick to mark item as item with bonus.
CATEGORY
Item group: Select the item group for the item in the item hierarchy from the drop-down list.
Item subgroup: Select an item subgroup, the lowest level of the item hierarchy, from the drop-down list.
Classification: You can change the classification (free grouping) by selecting one from the drop-down list.
Report category: You can change the report category (free grouping) by selecting one from the drop-down list.
Special group: Select a special group (free grouping) from the drop-down list.
Risk item: Choose to register with information about risks when buying an item.
Category manager: Identify who 'owns' the product in the organization.
Item category: You can change the grouping of items for managing/reporting purposes.
Product series: Used for grouping of items (for example different drink glasses in the same series).
PROCUREMENT
Sub-supplier: Select a sub-supplier from the drop-down list of suppliers marked as sub-suppliers.
Manufacturer: Select a manufacturer from the drop-down list of suppliers marked as manufacturers.
Manufacturer item no.: The manufacturer item number (alfa numeric text). It is an identifier when communicating with manufacturer.
Customs tariff number: Enter the total tariff number.
Can be ordered: Tick to indicate that the item can be ordered from the supplier. Items that cannot be ordered are normally included in order bundles with a given quantity per bundle.
Add freight: Tick to indicate that freight costs are to be added for the item.
Reserved for preorders: Tick to indicate that the item is reserved for preorders. This means that the available stock should be reduced by the quantities reserved in preorders.
Track stock changes for item: Tick to track stock changes for item.
Complaint permitted: Tick to indicate that complaints are permitted. If this box is not ticked for an item, the store itself must handle complaints. This can apply to bicycles in the sports industry, for example.
PACKAGE
Packaging code: Packaging code, standard CU for consumer unit (sales unit) and TU for trade unit (ordering unit).
Quantity in supplier packaging: Displays the quantity in supplier packaging.
Break bulk: Tick to break bulk. Unticked by default.
Min. order quantity: Indicate the minimum order quantity.
BUNDLE
Bundle item: Tick to indicate that the item is to be a bundle item. The “Bundle type” field and bundle contents will then be available.
.png "image(23).png")
You must Save any changes before you can edit the bundle content.
Bundle type: Select the bundle type from the drop-down list. Bundle contents: If the bundle has been created, the bundle items are displayed. By default, only 5 bundle items are displayed, but you can click on “See All” to display all bundle items. Click on “See only 5 items” if you only want to display 5 items.
Click on a bundle item to display the item details for that bundle item.
Edit bundle content
Click on the Edit bundel content button to open the “Bundle content” screen. You can add items and edit the content of an existing bundle.
.png "image(24).png")
Add item to bundle
Add items using the search function. Select an item from the search results and enter the quantity.
.png "image(25).png")
Click on Add to add the item to the bundle content table.
.png "image(26).png")
Edit row
You can edit items that have been added to the bundle content table.
Click on the “pencil” icon in the relevant row. The “Edit row” dialog opens, where you can change the quantity.
.png "image(27).png")
Click on Update to update the quantity.
Delete row
To delete a row, click on the “bin” icon in the row you want to delete. You will be asked to confirm that you want to delete the bundle item. The item will be removed from the bundle content when you confirm your deletion request.
After defining/modifying the bundle content, click on the Close button to return to the bundle item.
MEASURES
Volume (L): Specify the volume.
Width (cm): Specify the width.
Depth (cm): Specify the depth.
Height (cm): Specify the height.
Weight (kg): Specify the weight.
Tara (kg): Specify the Tara.
SERIAL NUMBER
Some items require registering of serial number (for example weapons). If the item requires serial number, you tick the field "Serial number is required on sale" and select a "Serial number type" in the item details view.
.png "image(28).png")
Select serial number type
When an item requires serial number on sale you must select a "Serial number type".
When you select serial number type, additional fields to register serial number attributes open.
.png "image(29).png")
Select the serial number attributes/properties for your item. These attributes provide more details about the item. Which serial number attributes you have depends on the serial number type configuration.
There are two registers for serial number: "Serial number type" and "Serial number attributes". See description of the registers below.
If there have been changes to the serial number attribute configuration, a message is displayed. The message informs the user that there is a new version of the configuration.
Click on the text Reload attributes, to reload the attributes. The updated version of the attributes is loaded.
.png "image(30).png")
Serial number type register
"Serial number type" register is used for grouping of serial number items. It displays a list of serial number types. You can add new serial number types and edit existing serial number types.
Create new serial number type
Click on the New serial number type button to create a new serial number type. A dialog box opens. Add code, name, and description (optional).
.png "image(31).png")
Click on the Create button, the details page opens.
View existing serial number type details
To enter the details of the existing serial number type, click on the underlined name of the serial number type. The serial number type details screen opens.
.png "image(32).png")
Serial number type details
In the serial number type details view you can edit serial number type and configure attributes to the serial number type. These attributes will be shown as fields if you select this serial number type in the Item detail's view.
.png "image(33).png")
Edit serial number type
Serial number type code and name is displayed on the top of the screen.
Click on the Edit serial number type button to edit.
You can edit code, name, and description.
.png "image(34).png")
Add attribute
In the "Add attribute" section you can add serial number attributes to the serial number type.
In the field "Attribute type" you have two choices; Serial number attributes register and Free text:
Serial number attributes register - Select Attribute from the serial number attribute register, add Description (optional). Click the Add button, the attribute is added to the table.
.png "image(35).png")
Free text – Add an attribute Name and add Number of characters and add a Description (optional). Click the Add button to add the attribute is added to the table.
.png "image(36).png")
Edit, delete or deactivate/activate attributes
In the table you see a list of the attributes added to the serial number type. On each attribute line you have tree buttons you can use if you want to edit, delete, or deactivate/activate the attribute.
.png "image(37).png")
Edit attributes - Click on the "pencil icon" to edit attribute. You can select another attribute and add description. Click Save to save changes.
Delete attributes – Click on the "trash icon" to delete the attribute from the serial number type.
More button (…) – Click on the "more button" to deactivate/activate the attribute.
Buttons at the bottom of the details view
In the bottom of the serial number type you have some buttons; "more button" (…), "Open attributes register" and "Close".
.png "image(38).png")
More button – If you want to deactivate the serial number type, you can click on the "more button" (…) and select "Deactivate". The serial number type is deactivated. You can activate the serial number type again by clicking the "more button" again and select "Activate".
Open attributes register – Click on Open attributes register button to open the Serial attributes register.
Close – Click on the Close button when you have added the attributes to the serial number type, to close the serial number type details.
Serial number attribute register
The register "Serial number attribute" is used for defining attributes used in serial number type register. It displays a list of serial number attributes. You can add new serial number attributes or edit existing attributes.
Create new serial number attribute
Click on the New serial number attribute button to create a new serial number attribute. A dialog box opens.
Add serial number attribute name, and description (optional).
.png "image(39).png")
Click on the Create button, the details page opens.
View existing serial number attribute
To view or enter the details of the existing serial number attribute, click on the underlined Name of the serial number attribute. The serial number attribute details screen opens.
.png "image(40).png")
Serial number attribute details
In the serial number attribute details view you can edit serial number attribute and configure the serial number attribute values. The values defined to the serial number attribute are displayed in the combo boxes in the item detail's view, if you select a serial number type with this attribute.
.png "image(41).png")
Edit serial number attribute
Serial number attribute name is displayed on the top of the screen.
Click on the Edit serial number attribute button to edit. You can edit name and description.
.png "image(42).png")
Click on Save to save your changes
Add value
In the Add value section you can add values to the attribute.
Add Name and Description (optional).
Click Add, the value is added to the table.
.png "image(43).png")
Edit, delete or deactivate/activate value
In the table you see a list of the values added to the serial number attribute. On each line you have tree buttons you can use if you want to edit, delete, or deactivate/activate the values.
.png "image(44).png")
Edit attributes - Click on the "pencil icon" to edit value. You can edit name and add description. Click Save to save changes.
Delete attributes – Click on the "trash icon" to delete the value from the serial number attribute.
More button (…) – Click on the "more button" to deactivate/activate the value.
Buttons at the bottom of the details view
More button – If you want to deactivate the serial number attribute, you can click on the more button (…) and select "Deactivate". The serial number attribute is deactivated. You can activate the serial number attribute by clicking the "more button" again and select "Activate".
Close – Click on the Close button when you have added the values to the serial number attribute, to close the serial number attribute details.
PRODUCT CLASSIFICATION
EN Standard: Classification according to European Standard (EN).
Environmental label: Enter a value if this environmental classification is used.
ADR classification: Indicate the hazardous goods classification.
Segment: Free classification of items.
Store Sub-department: Enter Store Sub-department.
Sub-collection: Enter Sub-collection.
Healthy: Tick to indicate that this environmental classification is used.
Ecological: Tick to indicate that this environmental classification is used.
Environmentally friendly: Tick to indicate that this environmental classification is used.
Dangerous goods: Tick to indicate that this classification is used.
RELATED ITEMS
If the item has related items, these items are displayed. Click on an item name to open the item details screen for the related item.
If there are no related items for the item, the message “Item has no relations” is displayed.
Add related items
Click on the View all button to open a screen where you can add related items.
.png "image(45).png")
Specify the Type, either “Alternative” or “Upselling”.
Select a related item using the search function. As you begin typing in the search box, the “Find item” dialog opens. Select an item from the search results.
.png "image(46).png")
Enter a Comment, where applicable.
Click on Change if you want to add related items for all sizes for the selected color. The “Add related item to” dialog opens.
.png "image(47).png")
Click on Add to add the item to the table. You can add multiple items.
.png "image(48).png")
Edit a related item
You can edit related items. Select the relevant item line and click on the “pencil” icon. The “Edit related item” dialog opens.
Here, you can change the type, enter a comment, and select which items the item relation should be updated in.
.png "image(49).png")
Click on Save to save your changes.
Delete a related item
You can delete related items. Select the relevant item line and click on the “bin” icon. The item will be deleted.
Click on Close when you have finished adding related items.
SEASON
Season: Select a season.
Season code: Select a season code.
Quarter code: Select a quarter code.
All seasons: Tick this box for year-round items.
PROCUREMENT SETTINGS
Procurement rule: You can delete related items. Select the relevant item line and click on the “bin” icon. The item will be deleted.
Replenishment code: Select a replenishment code for each profile.
Service level: Select a service level.
Auto replenishment: Tick if auto replenishment will be used.
Backorder allowed: Tick if backorder is allowed when the supplier does not have the item in stock.
Ordering blocked: Tick to block ordering of an item.
SALES DATE
Consumer sales start: Set the start date for consumer sales (dd.mm.yyyy).
Consumer sales end: Set the end date for consumer sales (dd.mm.yyyy.).
Supplier sales start: Set the start date for supplier sales (dd.mm.yyyy).
Supplier sales end: Set the end date for supplier sales (dd.mm.yyyy).
ASSORTMENT
Assortment code: Select can an assortment code for each profile if it is configured.
If "Use assortment per profile" is configured (set to True), you can set different value for the assortment for all the profiles in the system.
Click on the Manage assortment codes button.
The Assortment code view opens. In this view you set the assortment code for each profile.
If planning codes are enabled, the value of the system parameter "Use assortment per profile" does not have any effect on the system.
Collection: Select a collection for the whole assortment.
Sales purpose: Select a sale purpose for the whole assortment.
Sorting code: You can add sorting code for the whole assortment.
Base assortment: Indicates whether the item is part of the base assortment.
SCALES
Scale label: You can select scale label for the item. Select scale label from drop-down list. Scale labels is used for specifying preferable temperature for each type of food. From frozen food – 18 C to grilled chicken which should be warm for some time in +60 C. The information is sent by file to the scale system. Scale labels are defined in the Scale label register.
Scales: If the item is linked to any scales, you see the linked scales here.
If the item has no scales, then "Item has no scales" is displayed.
You can link scales to the item using the “Link to scale” function.
Click on the Link to scale button, the "Link to scale" screen opens.
Tick the wanted scales to link it to the item and click Save to link it to the item.
Self-service weights: Specifies if the item needs to be weighted by the customer during self-checkout.
FOOD
Country of origin: Select country of origin from drop-down list.
Shelf life (days): Add the items shelf life (days).
Best before: Best before flag. By default, the flag is set to "False." 
The "Best before" flag can also be a store local attribute, and can be managed in the “Local values” tab.
The flag can be imported and exported as both a common and store local value, using third-party systems or Excel.
Additionally, scale labels from Myhrvold and Strongpoint now track the "Best before" flag. When exporting item data (Item.Label.Export), the flag's value is included along with other scale data. If a store local value is set for the flag, it applies only to that particular store.
Alcohol by volume (%): Alcohol by volume in %.
Allergens
You can define the items allergens. All allergens have by default "undefined" status. There are four statuses to select:
Undefined
Does not contain
Might contain
Contains
Allergens are common for all items within a model.
Edit allergens
You can edit allergens. Click on Edit allergens, a new view opens.
.png "image(50).png")
Here you can define if the items contain allergens or not, by selecting status from the drop-down list.
You can also edit the allergens by clicking on the buttons at bottom of the screen (there is one button for each status), to update the different statuses on each allergen at once.
E.g., if you click on the Update contains button, the "Update contains" dialog opens. Tick the allergens that the item contains and click Save.
.png "image(51).png")
Click on Save to save your changes, changes are updated in Item detail's view.
Nutrition
You can define the items nutritional contents per 100 g.
Edit nutrition
You can add/edit nutrition. Click on Edit nutrition, a new view opens.
.png "image(52).png")
Add the items nutritional contents per 100 g.
Click Save to save the changes.
WEIGHT DECLARATION
Weight declaration is used to add a weight declaration to the item. It is used for export to fresh food weights for label printing. You can add/edit weight declaration.
Click on the Edit weight declaration button. The "Edit weight declaration" dialog opens.
.png "image(53).png")
Add/edit weight declaration and click Save to save the changes.
PRODUCT INFORMATION
Publish to web: Tick if product information should be published on the web. Used to confirm that all item information is correct, and item can be sold in web shop.
Product features: You can enter a description of product features here.
Advertisement information: You can add advertisement information here.
Technical information: You can add technical information about the item here.