In the bottom of the details tab view you have the options “Print labels”, “Upload image” / “Change image”, “Export to excel”, “Manage item”, “Save” and “Item generations” (if item generation is in use).
.png "image(57).png")
Save
Click on the Save button at the bottom of the screen to save your changes. If you have made changes to an item that has variants (color and/or size), the “Save changes” dialog will open. This asks how you want to save the changes to these items and presents four options; This item, Selected colors, Selected sizes and All items.
This item
Select this option if you want to save the changes only for this item.
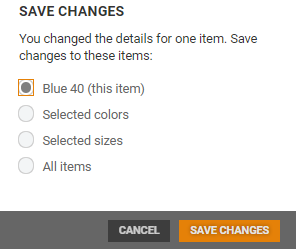
Click on Save changes to save your changes.
Selected colors
If you choose the selected colors option, the model’s colors are displayed. Tick the colors you want to save the changes too.
If you click on the color name or on the tick next to the name, the sizes available for that color will be displayed. You can then select the sizes you want to save the changes to.
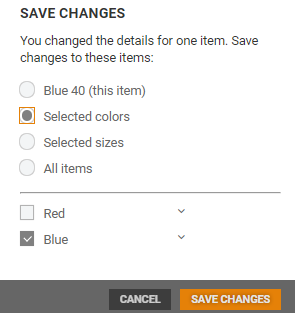
Click on Save changes to save your changes.
Selected sizes
If you choose the selected sizes option, the model’s sizes are displayed. Tick the sizes you want to save the changes too.
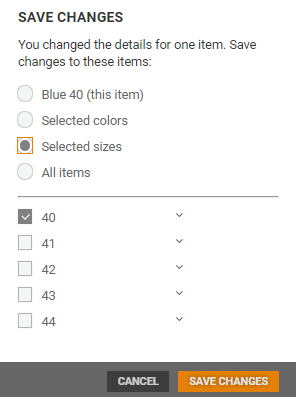
If you select one of the sizes, the colors available for that size will be displayed. Select the colors you want to change.
Click on Save changes to save your changes.
All items
Select “All items” if you want your changes to be saved for all items in the model.
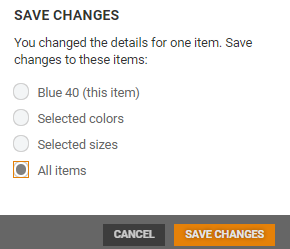
Click on Save changes to save your changes.
Manage model
This function is only available for items with variants (with a color and/or size).
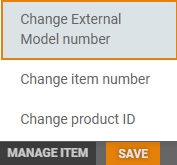
You can use the “Manage Model” function to add new items, change external model number, item number, product ID, size, color, and sorting. Select wanted option.

Add new items
You can add new items to the variant.
Click on the Manage model button.
Select Add new items.
The “Add new items” dialog opens. Select whether you want to generate a GTIN automatically or enter it manually.
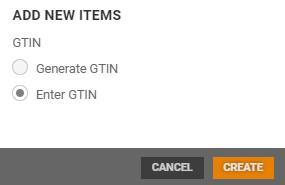
Click on Create.
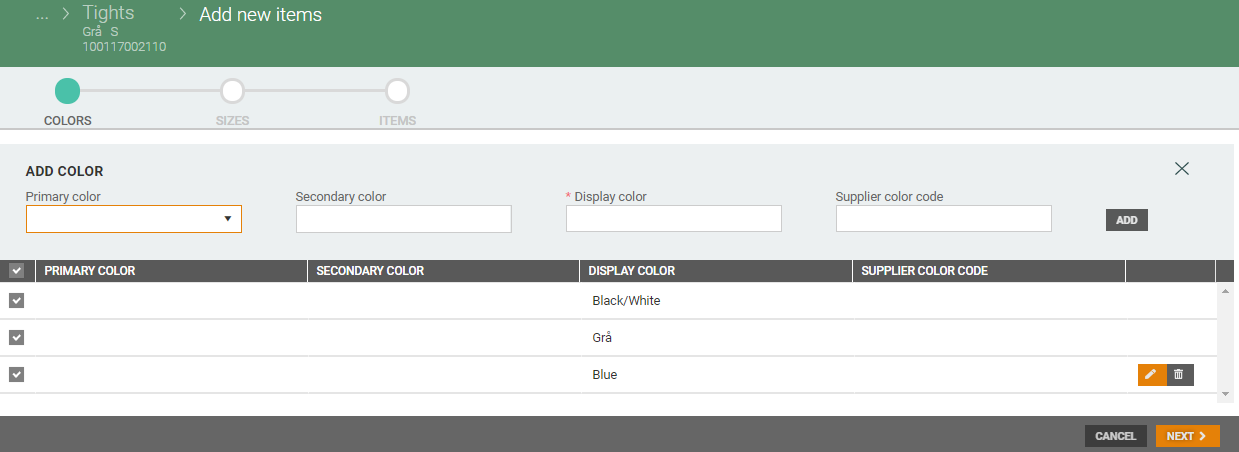
The “Add new items” wizard opens, where you can add new colors and sizes for the variant.
Step 1 – Colors
The colors added when the model was created are displayed on screen. To create a new color, follow the same process as when the model was created. You can skip to the next step without adding a new color.
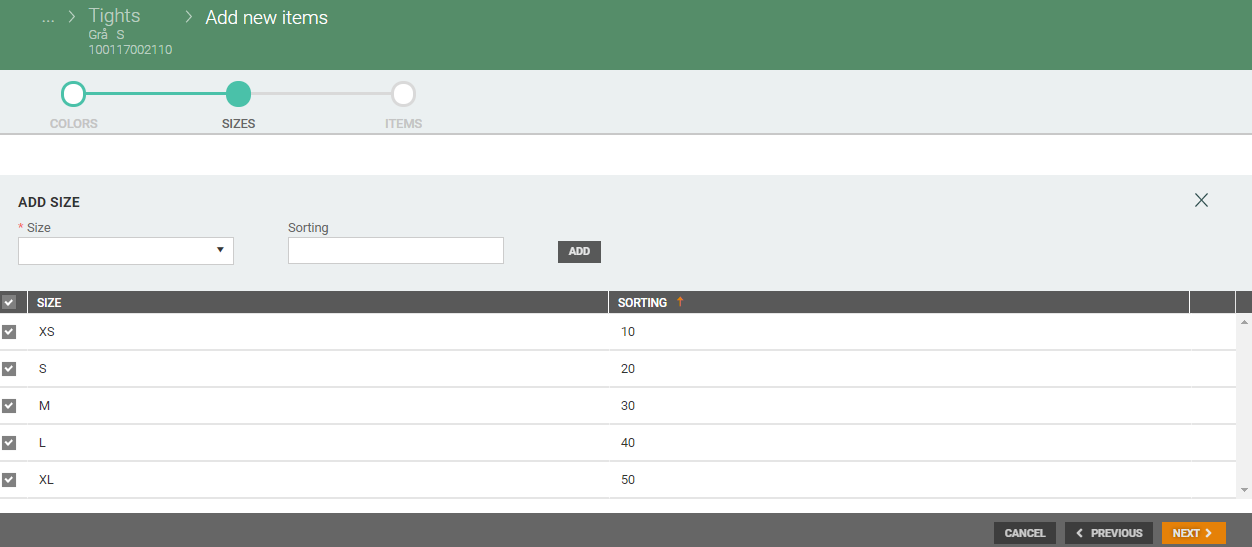
Step 2 – Size
The sizes added when the model was created are displayed on screen. To add a new size, select Size and sorting and click on Add. You can skip to the next step without adding a new size.
Step 3 – Items
Existing items are not displayed on screen. Only the new variants (new combinations of model-color-size) are displayed. Only items that require a GTIN are displayed. If you selected “Enter GTIN”, the GTIN column is also displayed.
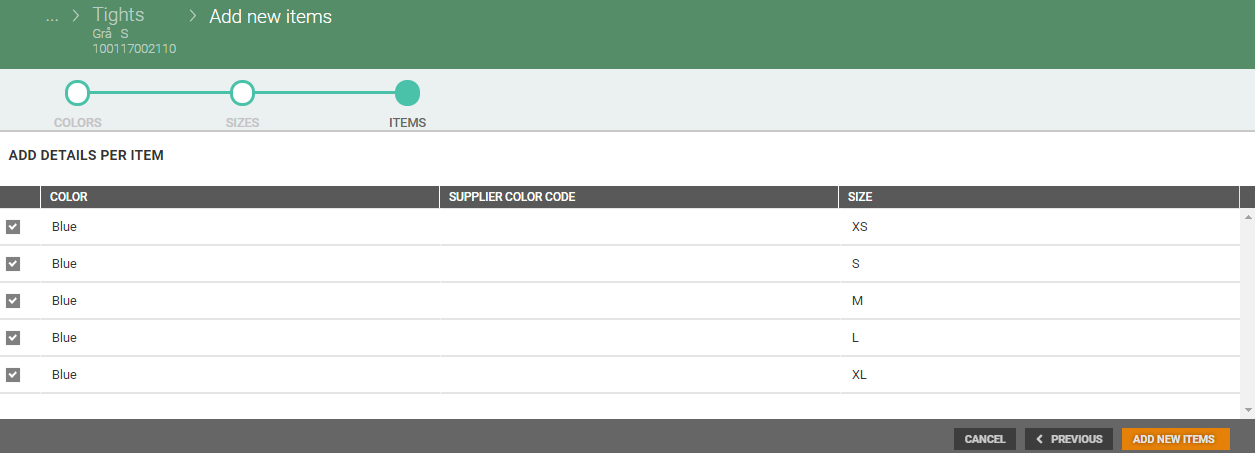
Rules for step 3:
New color added – All sizes must be added to the new color. All variants of the new color are preselected.
New size added – The size must be added to all existing colors (if a new color is added, the size must also be added to the new color). New variants are preselected.
Click on Add new items to create the new items.
Change External Model number
You can change the external model number.
Click on the Manage model button.
The "Change external model number" dialog opens. Add external model number, the value must be unique amongst all models.
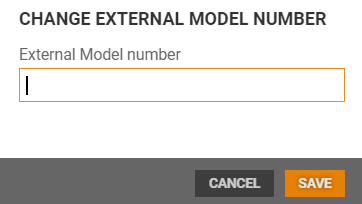
Click on Save. The external model number is validated.
Change item number
You can change item number. Click on the Manage model button.
The "Change item number" dialog opens. Add item number, the value must be unique.

Click on Save. The item number is validated.
Change product ID
Select Change product ID to open the "Change Product ID" dialog. You can insert or change product ID.
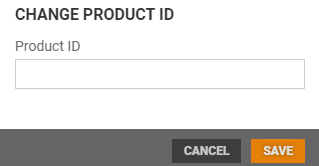
Add product ID and click on Save.
Change size
Select Change size to open the “Change size” dialog.
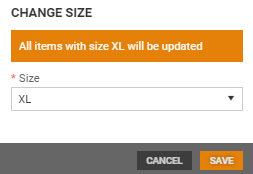
Select a size and click on Save.
Change color
You can change the color by selecting Change color, which will open the “Change color” dialog.
You can select a Primary color, Secondary color, and Display color (same procedure as when you create a color for a model).
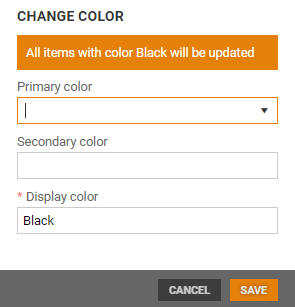
Change the color and click on Save.
Change sorting
You can change the sorting by selecting Change sorting, which will open the “Change sorting” dialog.
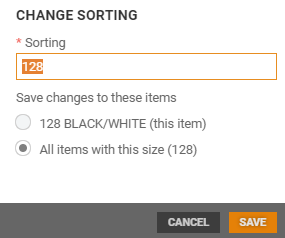
Change the sorting and click on Save.
Manage item
This function is only available for items without variants.
You can use the “Manage Item” function to 'Change external model number', 'Change item number' and 'Change Product ID'.
Select wanted option.
Change External Model number
You can change the external model number.
Click on the Manage item button and select "Change External Model number".
The "Change external model number" dialog opens. Add external model number, the value must be unique amongst all models.

Click on Save. The external model number is validated.
Change item number
You can change item number. Click on the Manage item button and select "Change Item number".
The "Change item number" dialog opens. Add item number, the value must be unique.
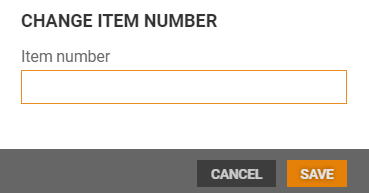
Click on Save. The item number is validated.
Change product ID
You can change the product ID.
Click on the Manage item button, and select “Change Product ID”.
The "Change product ID" dialog opens. Add product ID.
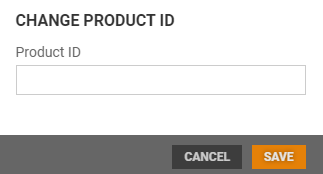
Click on Save.
Manage item texts
Item text for multiple languages can be edited.
Click on the Manage item button and select "Manage item texts".
.png "image(55).png")
Manage item texts view open on a new page. It displays item texts for languages based on the countries that are currently selected as system countries. Language for default system country is marked as default.

All fields are validated, so if there is an item text for given language, "ItemText", "LabelText1" and "ItemReceiptText" must be filled in before saving.
Item text fields for a language that does not have a value are not mandatory, but once the user starts entering values, they become necessary.
Export to Excel
Items can be exported to Excel from item details.
Click on the Export to Excel button.
The exported Excel file can be used as a template for the Excel import on selected level!
Item text fields for a language that does not have a value are not mandatory, but once the user starts entering values, they become necessary.
If the item has a color/model, there are three options available:
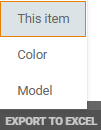
This item – Export only this item to Excel
Color – Export all variants of the model that have the same color as the item on the item details screen to Excel.
Model – Export all variants (combination of color/size) within the model to Excel.
If the item does not have any variants, the “Export to Excel” screen opens without any additional options.
The “Export items to Excel” screen shows how many items will be exported to Excel.
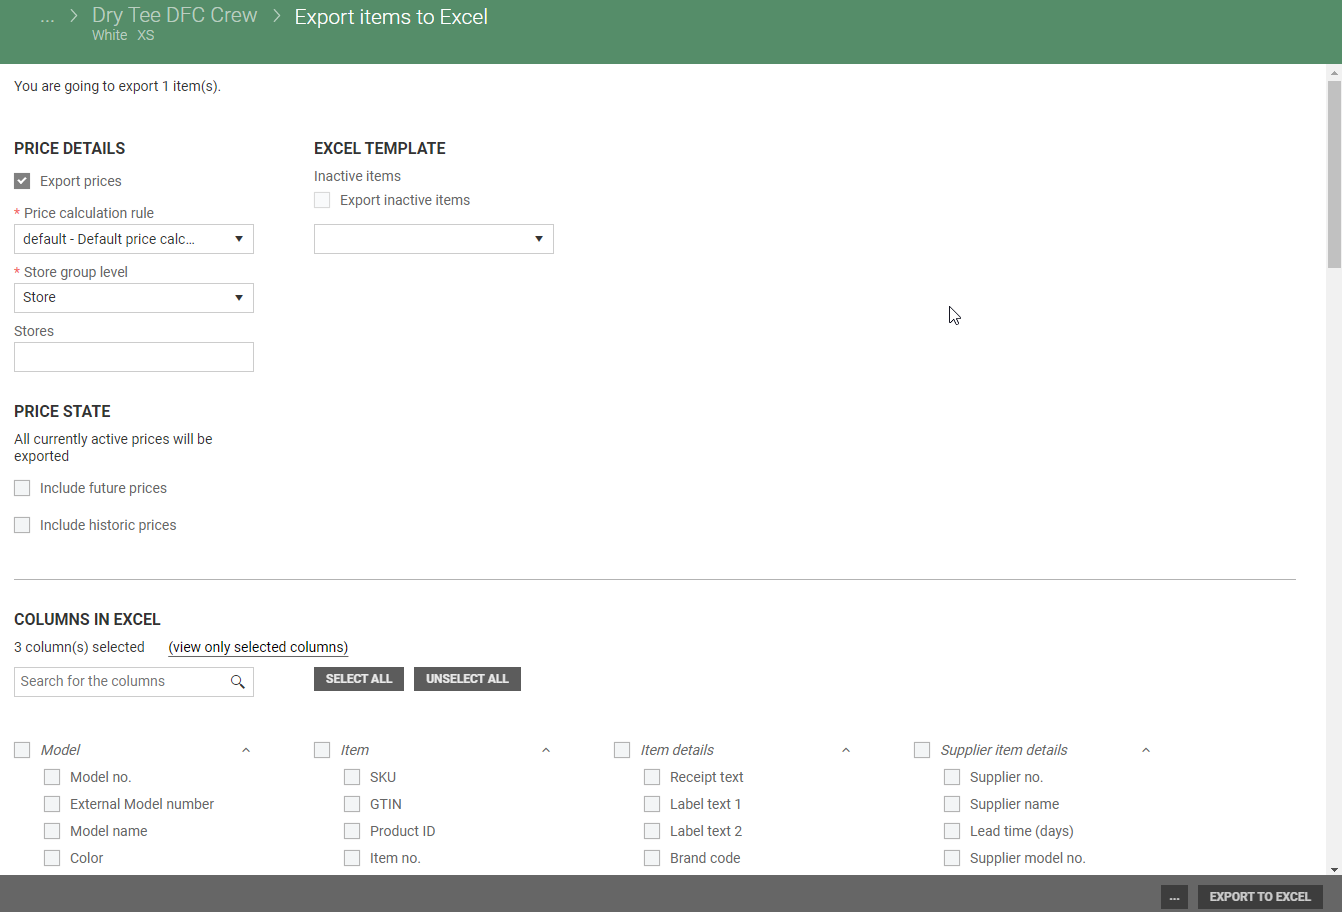
For a more detailed description of how to specify what you want to export, see Export items to Excel.
When you export to Excel from the item details screen, you can also tick to export inactive items.
![]()
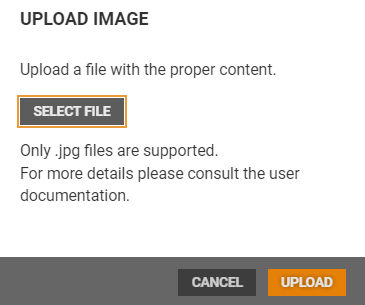
Upload image
It is possible to upload image to the item/model in item details.
Upload image on item
Click on the Upload image button, the "Upload image" dialog opens.
Click Select file to select an image to upload. The image must be in .jpg format.
Select an image and click on Open to upload the image.
Click on Upload to upload the image to the item.
Upload image on model items
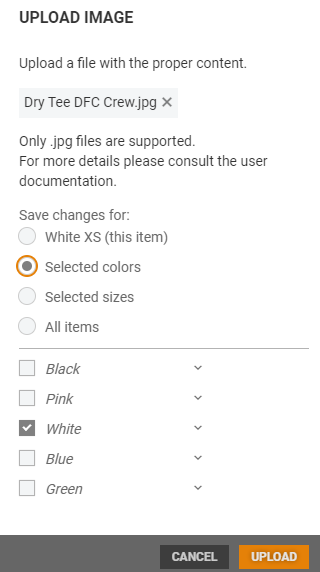
If the item is a model item, you can choose the variants you want to upload the items for.
Click on the Upload image button, the "Upload image" dialog opens.
Click Select file to select an image to upload.
Select an image and click on Open to upload the image.
If you want to save changes for all sizes to the selected color, you click on the Upload button.
If you do not want to save changes to all sizes of the selected color, you can click on the "Change" link. Options to select the variants you want to change opens.
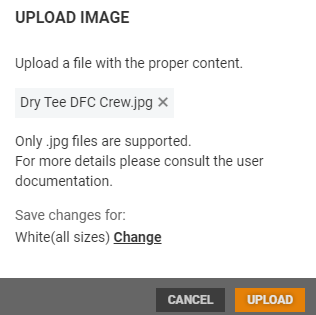
This item
If you want to save the changes only to this item, you select this item (it is the default choice).
Click on Upload to save the changes to this item.

Selected colors
Tick "Selected colors", the model colors are displayed.
Tick the colors you want to change.
Click on Upload to save the image to the selected colors.
Selected sizes
Tick "Selected sizes", the model's sizes are displayed.
Tick the sizes you want to change.
Click on Upload to save the image to the selected sizes.

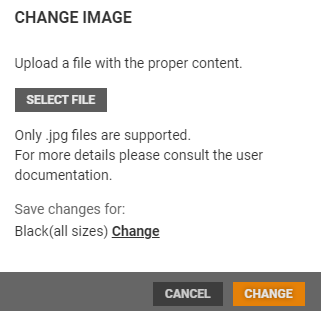
Change image
It is possible to change the image on an item/model.
Click on the Change image button, the "Change image" dialog opens.
Click Select file to select an image. The image must be in .jpg format.
Select an image and click on Open to upload the image. Click on Change to upload the image to the item.
If the item is a model item you can choose whether you want to upload image and save these changes for: This item, Selected colors, Selected sizes, or All items within the model. The same method as in the" Upload image" function.
Print labels
You can print labels for a specific item from the Item details view, using the Print Labels function.
Click on the Print labels button. The "Print labels" dialog opens.
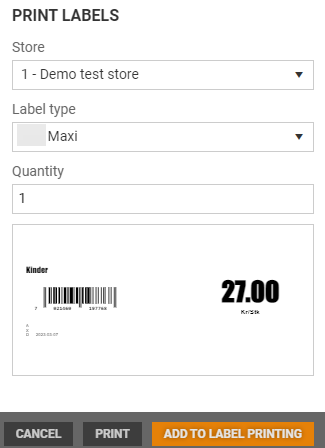
Store - Select Store, you can only select the stores you have permission to.
Label type - Select "Label type" from the drop-down list. Available label types are shown based on chosen store. You see a preview of the selected label type.
Quantity – Enter wanted quantity.
There are two ways to print labels:
Print labels manually
Click on the Print button. A print dialog opens, it displays a preview of the label(s). You can change printer options.
Click on the Print button to print the labels.
Add to label printing
If you want to print the label later, you can click on the Add to Label printing button. If you select this option you go to the "Label printing" menu later, to print the label.
Preconditions for label printing from Item details view
Label types must be defined on the item.
Labels can only be created for stores that has a price.
Only users with permission to print labels can print labels. The button is only visible for users with this permission.
Only label types that are defined in the Label type register can be used. There is one exception, label type None can be added to a store although it is not assigned in the register.
Stores that has Label type 'None' or no label type assigned in the register is unable to create a label (the label type is blocked).
Item generations
Item generation details
Information about the planning code/item generation is displayed on the Details tab if item generation is in use. The newest planning code is displayed. If there are several current planning codes, these are displayed side by side, making it easy for the user to compare values by ticking planning codes.
You can choose which item generations to display using the “Displayed item generation details” function.
If the item does not have any current planning codes, the last one (sorted alphabetically) is displayed.
System parameter UsePlanningCodes must be True to use planning codes attributes.
When the parameter is disabled (set to False) it is possible to use planning code attributes without defining the planning codes. The field "Original planning code is hidden, and the button "Manage item generations" is hidden.
To manage item generations, i.e., where the same item is planned/sold in several seasons, you can add multiple planning codes to the item. All the information for each season will be displayed on the Details tab.
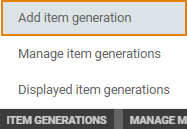
Add item generation
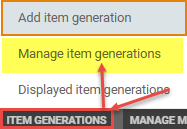
To add item generations to an item, click on the Item Generations button.
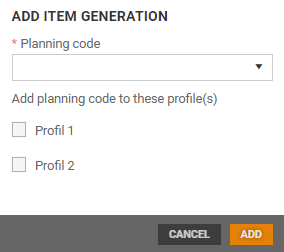
Tick the profiles you want to add the planning code to. The “Selected items” and “All items” fields are displayed below the profile.
Tick to select which items you want to add the planning code to.
Click on Add to add the planning code. The item details screen opens. Categories have been added containing corresponding fields for the planning code.
You can also add planning codes from the “Manage item generations” screen. The process is the same as for adding an item generation from the item details screen. Add planning codes in the table on the “Manage item generations” screen.
Click on Close to close the “Manage item generations” screen. This will return you to the item details screen.
Manage item generations
Planning codes can be edited. Click on the Item Generations button and select “Manage item generations”.
The “Manage item generations” screen is then displayed. This provides an overview of the existing planning codes for the item, and which profiles the planning code applies to.
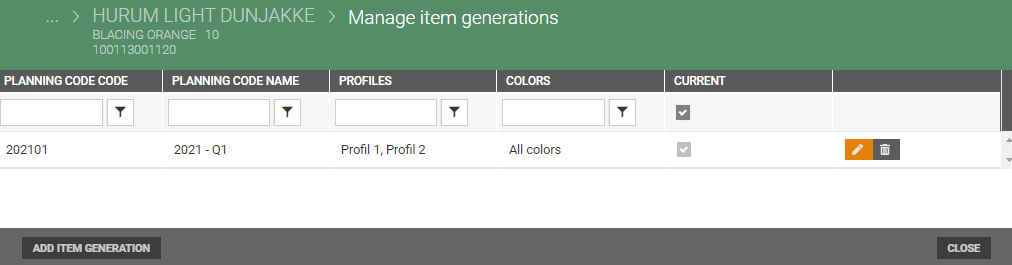
You can edit or delete existing item generations as well as add item generations.
Edit item generation
Select the planning code you want to edit. Click on the “pencil” icon.

The “Edit item generation” dialog opens. Here you can see for which profiles the planning code is available.
You can change which profiles it applies to and specify whether it applies to all items or only to selected items for the profile.
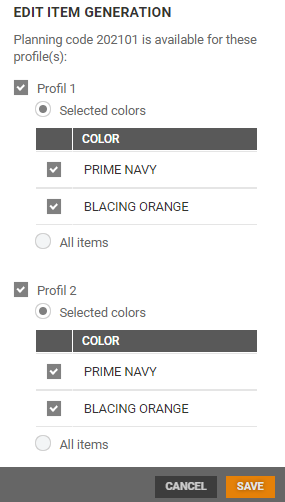
Click on Save to save your changes.
Delete item generation
Select the planning code you want to delete. Click on the “bin” icon.
The “Remove item generation” dialog opens, which tells you that you are about to remove the item generation. It also warns you that all information within the item generation will also be removed.
Choose whether to apply the changes to all items or only to selected colors.
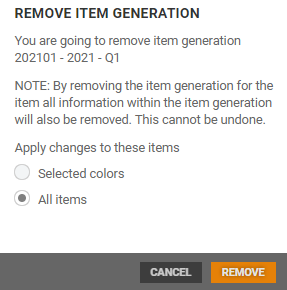
Click on Remove to remove the item generation for selected items.
Displayed item generation
You can choose which of the store’s current planning codes/item generations you want to display for the item.
Click on the Item Generations button at the bottom of the screen and select “Displayed item generations”.
The “Displayed item generations” dialog opens. You can see which item generations will be displayed on the item details screen. Tick the item generations you want to display or untick those you do not want to be displayed.
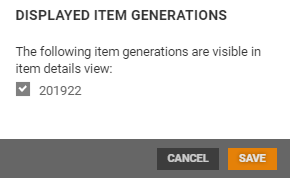
Click on Save to save your changes.