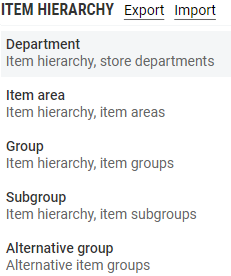
There are five levels in the item hierarchy. The top level is Department, followed by the levels Item area, Item group, Subgroup and Alternative group.
A department can be linked to multiple item areas, an item area can be linked to multiple item groups, and an item group can be linked to multiple subgroups. Use the registers under Item hierarchy to define the structure of the hierarchy.
You can navigate within the hierarchy from each of the registers in the item hierarchy by using links to other levels and by viewing details about the subordinate levels. This allows you to move around the different levels of the hierarchy.
Item hierarchy can be imported and exported.
Item hierarchy names in multiple languages
The item hierarchy attribute names are displayed for supported languages in the Details page, of each hierarchy attribute. User can add and edit item hierarchy names for supported languages using the edit modal. At least one name is required.
In exported Excel file, sub columns based on the supported languages are displayed. All hierarchy attributes are exported with names for all supported languages. If there is no name, the field in the Excel file will remain empty.
User can also add or update names for all supported languages via import. If the imported file Excel/JSON does not have names for all supported languages, a name for the default language is created automatically, as at least one name is required.
Export Item hierarchy
Item hierarchy can be exported.
Click on the underlined Export text beside the Item hierarchy section.

The Export item hierarchy dialog opens. You must confirm that you would like to continue.
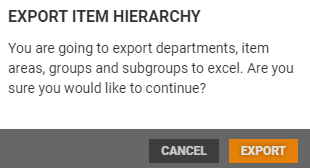
Click Export to export the item hierarchy or click Cancel to cancel the export.
A message is displayed at the bottom of the screen when the export starts. You will get a notification when the export is ready.

When the export is ready you can view the exported file and save the file.
You can modify the wanted rows in the exported file and use it as a basis for the import. Remember: NOT remove or unhide row 2 which contains the column definitions.
Import Item hierarchy
Item hierarchy can be imported with item group names in different languages (languages of system countries set in registers).
Easiest way to do it is by modifying exported item hierarchy file. It should be modified to meet following condition:
Sending empty columns is not supported, so creation/modification of different level hierarchies should be separated. For instance, import of only departments with no 'children' elements should not contain any further columns. When sending item subgroups, all columns on the left should be filled with correct values (of parent hierarchy).
If item group names were created manually via user interface or via import with no specified language, then they will be assigned to default language that is set on the system. To add item group names for different languages, Excel file with filled correct - accordingly named columns should be imported.
In export, item group names are in columns with language for which they were created. Changing default language will not result in copying names, they need to be still added.
It is not possible to delete item group name by import.
You can modify the exported hierarchy file and use it as a template for the import. Remember to NOT remove or unhide row 2 which contains the column definitions!
Click on the underlined Import text beside the Item hierarchy section.

The “Import item hierarchy” dialog opens. Click on Select file to select a file to upload. This file must be in .xlsx format.

Select a file and click on Open to upload the file. Click on Import to import the item hierarchy.
Department
The Department register displays an overview of the registered departments. You can maintain existing departments and add new departments. From the department details screen, you can navigate down the levels of the hierarchy.
Department is the top level of the item hierarchy.
.png "image(949).png")
Table showing an overview of the departments
New department
To create a new department, click on the button marked New department.
The “New department” dialog opens.
Enter a department number and a department name.
.png "image(117).png")
Click on Add to create the department.
View department details
Click on the name on the line for the relevant department to view department details.
The department details screen opens. Details about the chosen department are displayed at the top of the screen, while a table of “Linked item areas” is displayed in the lower section of the screen. You can edit the department details and navigate within the department hierarchy here.
.png "image(953).png")
Edit department
The department number and department name are displayed at the top of the screen.
Click on the Edit department button in the department details screen to edit the department name.
.png "image(952).png")
Click on Save to save your changes.
The “Edit department” function is also available from the Department overview. You can open the dialog by clicking on the “pencil” icon on the relevant department line. The editing process is the same.
![]()
Deactivate department
A department can be deactivated if it is not linked to other groupings. In other words, there must be no item areas, item groups or subgroups linked to the department.
You can then deactivate the chosen department by clicking on the “more” button at the bottom of the department details screen and selecting “Deactivate”.
.png "image(99).png")
If you attempt to deactivate an item that has links to an item area, etc., a message will be displayed stating that all child items must be deactivated before this item can be deactivated. You cannot deactivate the department until this is done.

Linked item area
The department details screen's lower section has a table showing an overview of the item areas linked to the department. You can view details about an item area by clicking on the orange arrow on the line for the selected item area. This opens a new screen displaying item area details and a table of item groups linked to the item area. This allows you to navigate within the item hierarchy.
.png "image(950).png")
New item area
You can create new item areas from the chosen department details screen.
Click on the New item area button.
The “New item area” dialog opens.
Enter the area number and area name.
.png "image(951).png")
The name of the department you are in is preselected in the Department name field.
You can select a different department name, but the new item area will then be linked to the department you select.
Click on Add to create the item area.
Item area
The Item area register shows an overview of the registered item areas and the department to which it is connected. You can maintain and edit existing item areas and create new item areas. The second level of the item hierarchy is Item area. You can navigate within the hierarchy from the item area details screen.
.png "image(955).png")
New item area
To create a new item area, click on the New item area button at the bottom of the screen. The “New item area” dialog opens.
.png "image(101).png")
Area no.: enter an item area number.
Area: enter an area name.
Department name: Select a department to link the item area to.
Click on Add to create the item area.
View item area details
Click on the name on the line for the relevant item area to open the item area details screen.
Information about the item area and parent hierarchy is displayed at the top of the screen, with a link to the department to which the area is linked.
.png "image(956).png")
A table of “Linked item groups” is displayed in the lower section of the screen. From this screen, you can open a new screen containing item group details. To do this, click on the underlined name of the relevant item group. A new screen then opens displaying item group details and linked subgroups.
This allows you to navigate within the hierarchy to the lowest level, which is subgroup.
Edit item area
Information about the item area number, item area name, and parent hierarchy is displayed at the top of the screen.
Click on the Edit item area button to edit the area name.
.png "image(957).png")
The “Edit item area” dialog opens. Edit area number and area. The department name indicates the department to which the item area belongs. You can select a different department, but if you change the department, the item area will be linked to the department you select.
.png "image(958).png")
Click on Save to save your changes.
The “Edit item area” function is also available from the table. You can open the dialog here by clicking on the “pencil” icon on the relevant item area line. The editing process is the same.
![]()
Linked item groups
The lower section of the screen contains a table displaying an overview of the item groups linked to the selected item area. You can view details about an item group by clicking on the orange arrow on the line for the selected item group. A new screen then opens displaying details about the item group and linked subgroups.
.png "image(960).png")
This screen displays details about the item group, including the name, parent hierarchy with links to other levels in the hierarchy, and other settings.
New item group
You can add an item group from the item area details screen.
Click on the New item group button in the chosen item group details screen.
.png "image(103).png")
The “New item group” dialog opens. Enter the group number and name of the item group.
Department name and Area name are preset to the name of the department/item area you have selected.
You can select a different item area, but the new item group will then be linked to the item area you select.
.png "image(961).png")
Cost carrier: Specify an optional cost carrier.
Alternative group: Select an optional alternative item group.
Complaint permitted: Tick to indicate that complaints are permitted.
Payback: Tick this box if payback applies to items in the item group.
Default price calculation: Select default price calculation.
Click on Add to create the item group.
Item group
The Item group register displays an overview of the registered item groups and the item area to which the item group is linked. You can view details about existing item groups, edit groups and create new item groups. You can navigate within the hierarchy from the item group details screen.
Group is the third level in the item hierarchy.
.png "image(962).png")
New item group
To create a new item group, select the New item group button. The “New item group” dialog opens. Fields marked with * are mandatory.
.png "image(963).png")
Group no.: Enter the item group number.
Group: Enter the name of the item group.
Select the hierarchy for the item group. You can specify which department and item area the item group will be linked to.
Department name: Select a department.
Item area name: Select an item area.
Cost carrier: Specify an optional cost carrier.
Alternative group: Select an optional alternative item group.
Complaint permitted: Tick to indicate that complaints are permitted.
Payback: Tick this box if payback applies to items in the item group.
Click on Add to create the item group.
View item group details
Click on the item group name on the line for the relevant item group to open the item group details screen.
Information about the item group and parent hierarchy is displayed at the top of the screen, with a link to the department and area to which the group is linked.

A table of “Linked item subgroups” is displayed in the lower section of the screen. From this screen, you can open a new screen containing item subgroup details. To do this, click on the item subgroup name on the line of the relevant item group. A new screen then opens displaying item subgroup details. Item subgroup is the lowest hierarchy level.
Edit item group
Information about the item group number, item group name and parent hierarchy, among other things, is displayed at the top of the item group details screen.
Click on the Edit item group button to edit the item group. The “Edit item group” dialog opens.
.png "image(108).png")
Select the hierarchy for the item group here. You can specify which department and item area the item group will be linked to.
Department name: Displays the department, which is the top level of the hierarchy for the item group and cannot be changed.
Area name: Displays the item area to which the item group is linked. You can change this to another item area that is linked to the department and the item group will then be linked to the item area you have selected.
Cost carrier: Specify an optional cost carrier.
Alternative group: Select an optional alternative item group.
Complaint permitted: Tick to indicate that complaints are permitted.
Payback: Tick this box if payback applies to items in the item group.
Default price calculation rule: Select default price calculation rule.
Click on Save, to save your changes.
The “Edit item group” function is also available from the table. You can open the dialog here by clicking on the “pencil” icon on the relevant item group line. The editing process is the same.
![]()
Linked item subgroups
The lower section of the screen contains a table displaying an overview of the subgroups linked to the item group. Click on the line for a subgroup to view details about that subgroup. This opens a subgroup details screen displaying details about the subgroup and parent hierarchy.

New item subgroup
You can create a new subgroup from the item group details screen.
Click on the New item subgroup button. The “New item subgroup” dialog opens. Enter the item subgroup number and item subgroup name.
Department, Item area and Item group are pre-set to the names of the department/item area/item group you selected.
You can select a different item group, but the new subgroup will then be linked to the item group you select.
.png "image(112).png")
Payback: Tick this box if payback applies to items in the subgroup.
Click on Add to create the item subgroup.
Subgroup
The subgroup is the fourth and lowest level in the item hierarchy.
The Subgroup register displays an overview of the registered subgroups. You can add new subgroups, view the details of selected subgroups, and edit subgroup information.

New item subgroup
To create a new item group, select the New item subgroup button. The “New item group” dialog opens. Fields marked with * are mandatory.

Subgroup no.: Enter the item group number.
Subgroup: Enter the name of the item group.
Select the hierarchy for the item group. You can specify which department and item area the item group will be linked to.
Department: Select a department.
Item area: Select an item area.
Item group: Select an item group.
Payback: Tick this box if payback applies to items in the item group.
Click on Add to create the item group.
View subgroup details
You can view details about a subgroup by clicking on the name of the line for the relevant subgroup.
The chosen subgroup details screen opens. This displays information about the subgroup, the parent hierarchy, and other settings.

Below Parent hierarchy, you will find links you can use to navigate within the hierarchy to other sections of the hierarchy to which the subgroup belongs.
Edit item subgroup
Information about the subgroup number, subgroup name and parent hierarchy, among other things, is displayed at the top of the subgroup details screen.
Click on the Edit item subgroup button to edit the item subgroup. The “Edit item subgroup” dialog opens.
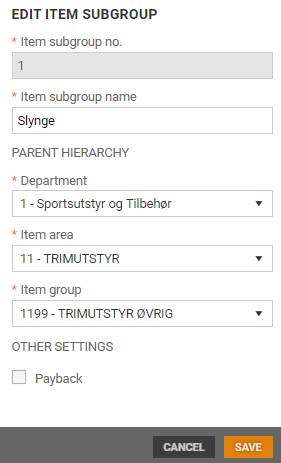
Department: Displays the department, which is the top level of the hierarchy for the subgroup and cannot be changed.
Item area: Displays the item area. You can change this to another item area that is linked to the department.
Item group: Displays the item group to which the subgroup is linked. You can change this to another item group in the hierarchy.
Payback: Tick this box if payback applies to items in the subgroup.
Click on Save to save your changes.
The “Edit item subgroup” function is also available from the subgroup overview. You can open the dialog here by clicking on the “pencil” icon on the relevant item group line. The editing process is the same.
![]()
Alternative group
The Alternative group register displays an overview of alternative groups. You can add new alternative groups and edit existing ones.

Add alternative group
You can create a new alternative group manually using the Add alternative group section at the top of the screen. Enter a Name and Number, and select Item group.

Click on Add to create an alternative group.
Edit alternative group
Alternative groups can be edited. Select the relevant alternative group and click on the “pencil” icon on the same line. The “Edit alternative group” dialog opens.
You can change the name or number if you wish. You can also select the item group.
