This page contains a description of the fields under Procurement in Item Registers.
Procurement rule
The Procurement rule register displays an overview of the registered procurement rules. You can maintain existing procurement rules, add new ones, and disable procurement rules. You can also specify a default procurement rule, which is then preselected on screens containing the “Procurement rule” field.

Add procurement rule
You can create a new procurement rule manually using the Add procurement rule section at the top of the screen. Enter a Code, a Name, and an optional Description.

Click on the Add button to create a procurement rule.
Edit procurement rule
Procurement rules can be edited. Select the relevant procurement rule and click on the “pencil” icon.
The “Edit procurement rule” dialog opens. Edit the values as required and click on Save.

The “more” button contains the “Deactivate” and “Set as default” functions. Use these functions to deactivate procurement rules and specify a default procurement rule.

Supplier
This register displays an overview of the registered suppliers. You can view the details held for existing suppliers, create new suppliers, export, and import suppliers. You can use the column selector to choose which columns are displayed.
.png "image(97).png")
Please note:
Suppliers cannot be deleted if they are linked to an item.
New supplier
Select the “New supplier” function to open the “New supplier” screen.
This screen contains various fields for you to complete with information about the supplier. Fields marked with * in front of the field name are mandatory and must be completed.

Information about the various fields
GENERAL
Supplier no.: Supplier number.
Supplier name: Supplier name.
Organization no.: The supplier’s organization number.
Vat number: Vat number.
GLN: Global Location Number, enter the supplier’s GLN.
Supplier: Tick this box if you are creating a supplier. The selection you make here determines the options available in the various drop-down menus.
Manufacturer: Tick this box if you are creating a manufacturer.
Sub-supplier: Tick this box if you are creating a sub-supplier.
Local supplier: Tick this box if you are creating a local supplier.
CONTACT PERSON
Name: Enter the name of the contact person at the supplier.
Email address: Registered email address of the contact person.
Mobile: Registered mobile number of the contact person.
Phone: Registered telephone number of the contact person.
Web address
You can register a web address.
Click on the Edit web address button, the "Edit web address" dialog opens.
Here you can add Web address and Text to display.

Click Save, to save the changes.
ADDRESS
Country: Select a country.
Address: Enter the first line of the supplier’s address.
Address 2: Enter the second line of the supplier’s address.
Postal code: Enter the supplier’s postal code.
City: Enter the name of the town or city.
Alternative address: Enter an alternative address.
PROCUREMENT
Reference: Reference.
Currency: Select a currency.
Language: Select a language.
Email for purchase orders: Enter email for purchase orders.
Free freight: Enter free freight.
EDI: Electronic data interchange. Tick box for EDI if the supplier use EDI.
Manual approval of order proposal: Tick this box if the manual approval of order suggestions is used.
Direct supplier: Tick this box if the supplier will be a direct supplier.
Replenishment: Tick this box for generating replenishment order proposals.
Generate order proposal: Tick this box if other order proposals should be generated for the supplier.
DELIVERY
Lead time (days): Number of days’ lead time. The total time it takes from the item being ordered to the item being delivered.
Transport time (days): Transport time (days).
Total lead time: Calculated lead time will be displayed.
Delivery conditions: Enter the delivery terms.
OTHER
Note: Used to record information about the supplier. The details entered in this field are displayed when you register an order for the supplier.
Reject VPI from this vendor: Tick this box if you want to reject VPI from this supplier. If this field is selected, VPI items from the supplier will be rejected on input.
Click on Save to save and create the supplier.
View/edit supplier details
Click on the name on the line for the relevant supplier. The supplier details screen opens. This displays various information about the supplier. The information is grouped into categories of related fields.
Here you can edit the various fields described over.

Click on Save to save your changes.
The “more” button contains the “Deactivate” and “Set as default” functions. Use these functions to deactivate supplier and to specify a default supplier, respectively.
.png "image(88).png")
Export to Excel
Supplier register can be exported to Excel. You can use the filter function to specify what you want to export, click on the Export to Excel button to export the selection to Excel.
You get a message when the export has started, and a notification when the file is ready.

When the export is ready you can open the file by clicking on the link in the notification. After downloading the file, you can modify/correct the content of the Excel file.
The exported Excel file can be used as an template for the Excel import!
Import from Excel
Suppliers can be imported. Click on the Import from Excel button.
The "Import suppliers" dialog opens. Click on Select file to select a file to upload. This file must be in .xlsx format.
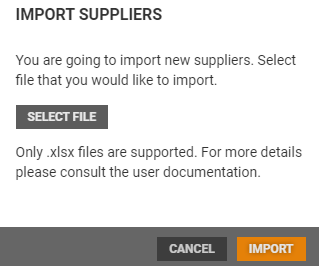
Select a file and click on Open to upload the file.
Click on Import, to import suppliers. The file is validated. If the validation is wrong, the user is informed with a notification.
If the file is correct the supplier is imported.