Released 7 September 2026
Help icon and tooltip for parameters
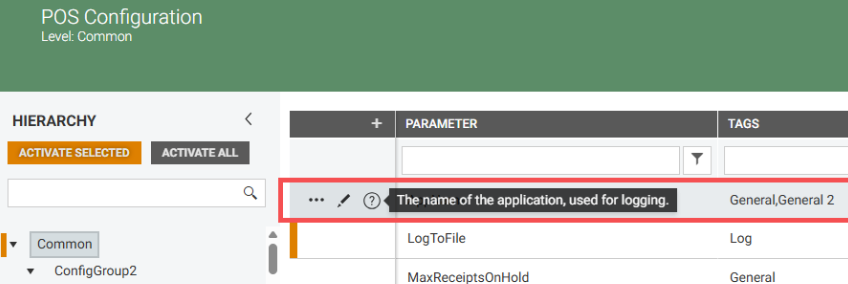
A ‘?’ icon appears next to each parameter. Hovering over the icon shows a tooltip with a short explanation of the parameter.
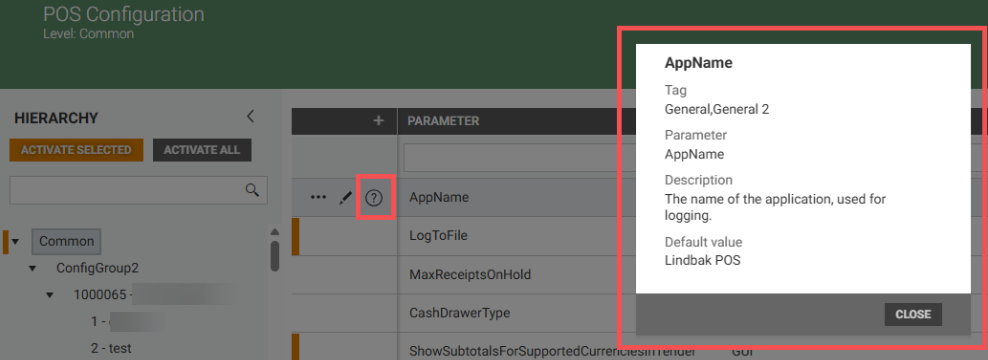
Clicking on the ‘?’ icon opens a details dialog with more information:
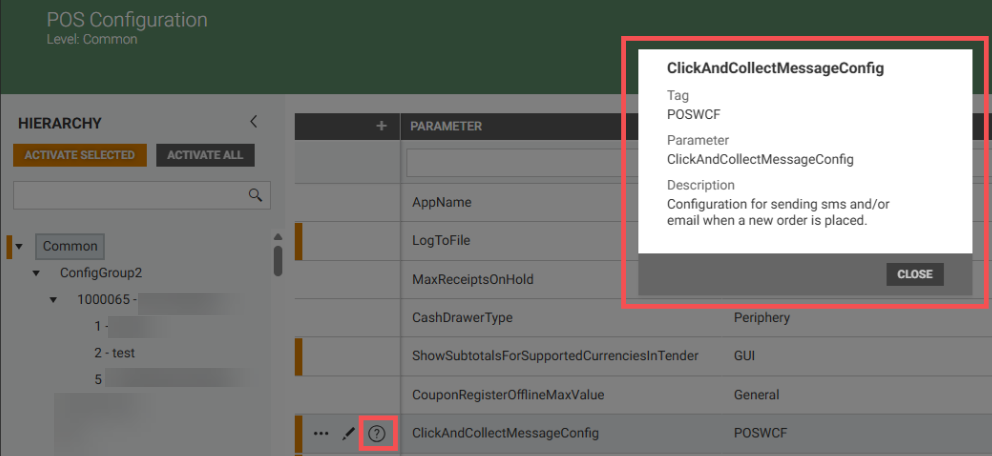
For complex parameters, the Default value is not shown in the details dialog to avoid confusion:
This helps users understand parameters without leaving the page.
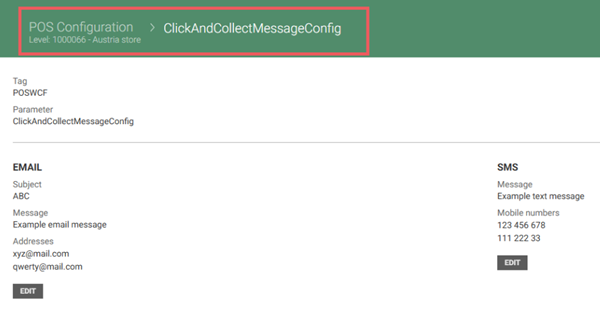
Update of header to show level below "POS Configuration"
When Common, Configuration group, store or cash register level was selected, then its name is displayed in the header.
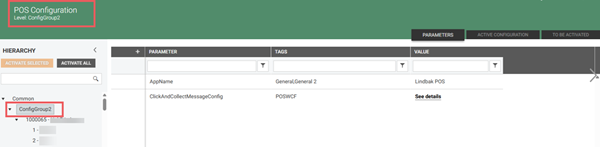
When editing complex parameter, then the information in the header allows to tell on which level the parameter will be updated. Clicking on “POS Configuration Level: x - store” causes going back to the main POS Configuration page.
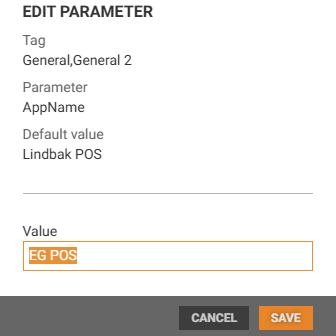
Update modal for edit parameter
After clicking the “pencil icon” next to parameter's name, “Edit parameter” dialog opens. Focus is set in the field and the current value is selected so user can change it easily. It applies to “Text/Integer/Date selector/Bool/Dropdown” parameters.
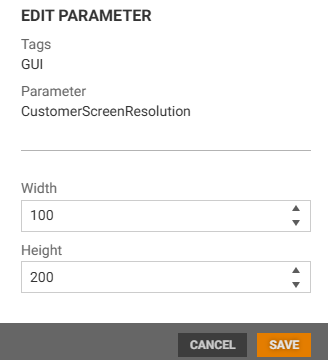
Size parameter
The top section contains a standard element with a tag and parameter name. Below a separator line, two fields are available: Width and Height.
Preview Display:
The preview is shown as text in the format: W / H where W is the Width and H is the Height.

Input validation:
Only integer values are allowed.
Decimals, characters, and special characters are not accepted.
If a field is left empty and the user clicks Save, show: "The field is required"
If a negative value is entered, show: "Invalid value"
View for editing complex parameters
For complex parameters, clicking Edit button causes redirecting to the edit page.
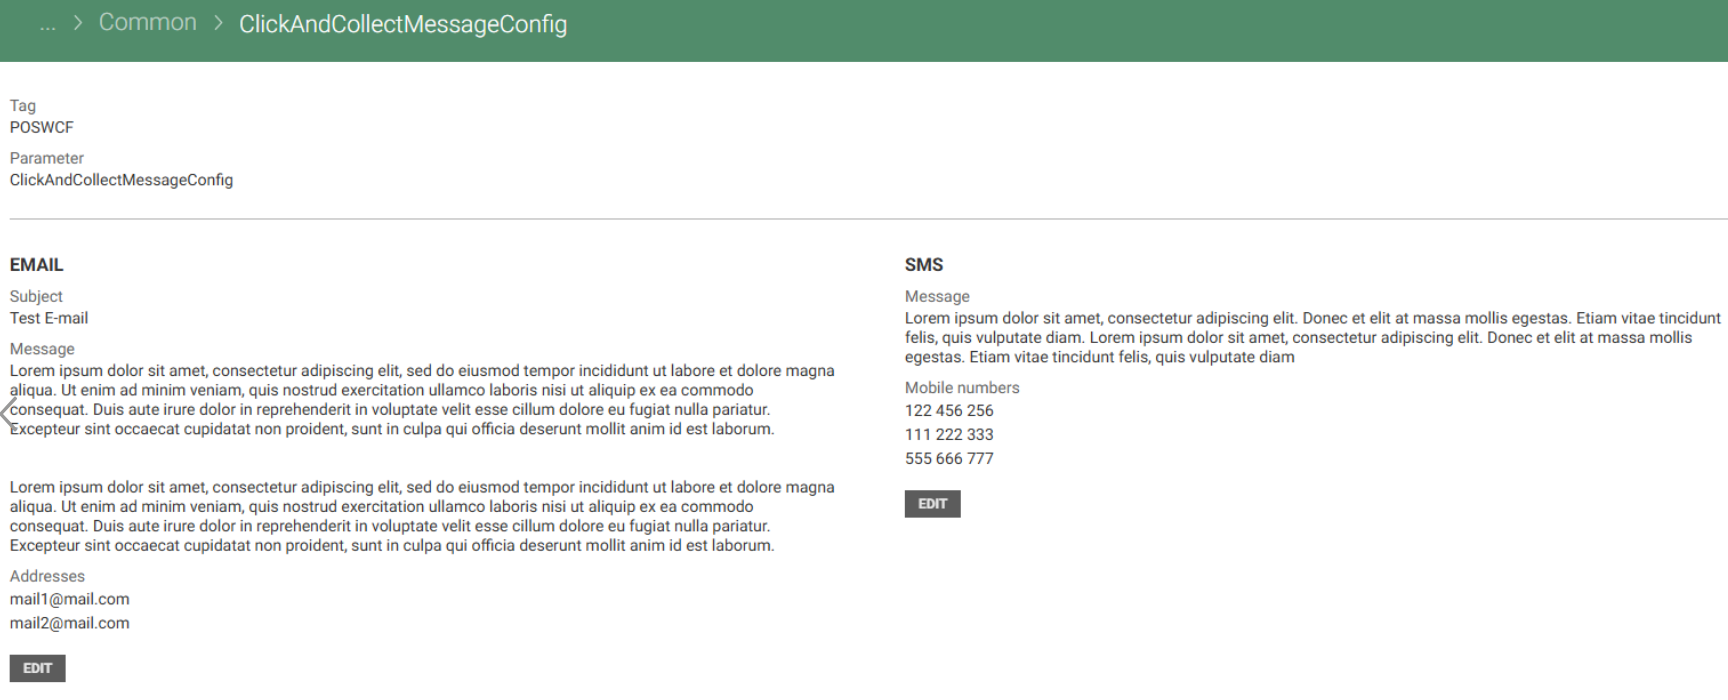
Handling of parameter type: EmailAndSmssConfig
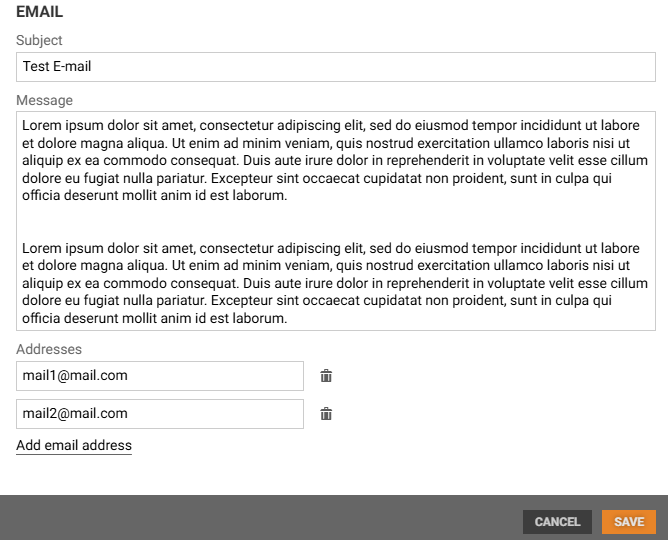
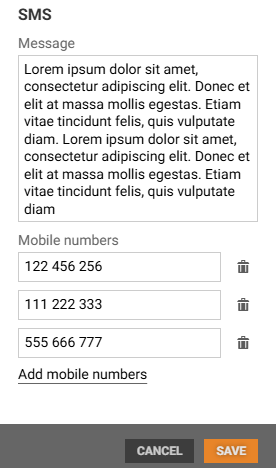
In top section there is a standard element that contains tag and parameter name. Under this section there are two columns. On the left side there is Email section and on the right side SMS section. Below each section there is an Edit button that opens edit mode for each section.
Email edit mode:
SMS edit mode:
Handling for parameter type: SignalLightConfigType
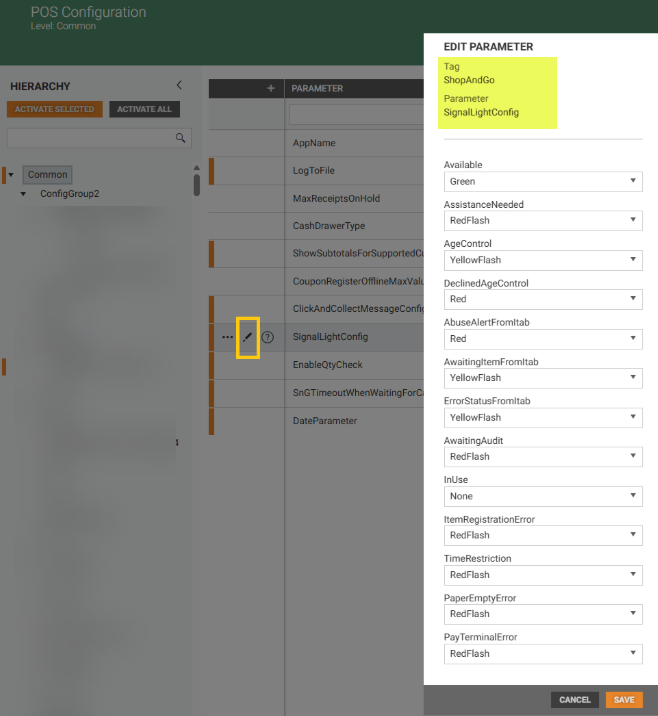
In top section there is a standard element that contains tags and parameter name.
Under this section there is a list of drop-down fields. All of them by default has some value selected. It's not possible to leave these fields blank. If user would not like to set any color then he needs to select None from the list.
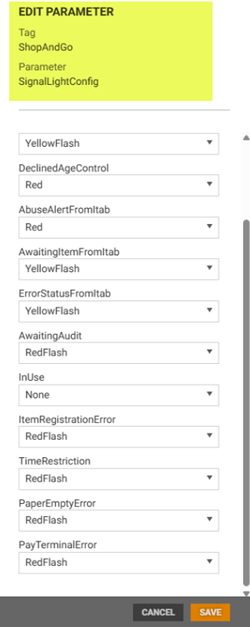
If modal reaches the maximum size then scroll is added to the dialog.
The SignalLightConfigType “Edit parameter” dialog opens when you click on the “Pen icon”:
SignalLightConfig with scrollable area:
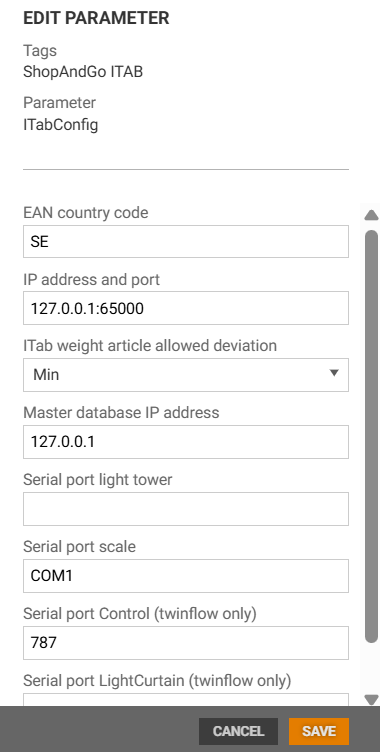
Handling for parameter types: ITabConfig, StoreInformation, ComPortConfig
The top section will display standard elements with the tag and parameter name. Some of these fields have default value and these values should be shown when entering the view for the first time. Fields are not mandatory so user can leave them blank. If the model exceeds its max height, the section becomes scrollable. Preview will be displayed as a link 'See details'.
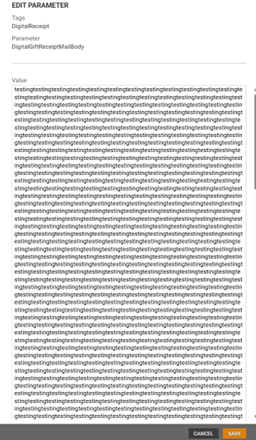
Long text parameter
The long text parameter modal appears centered on the screen, with width and height that dynamically adjust to the screen size. When the text input exceeds the visible area, a vertical scrollbar is displayed, allowing scrolling exclusively within the Value field.
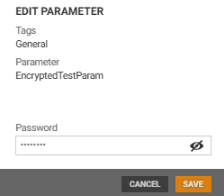
Encrypted String
New input field has been introduced with support for two visibility modes:
Encrypted (default): User input is masked and displayed as dots.
Standard: User input is shown as typed.
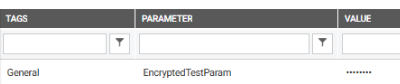
Users can easily switch between these modes using the eye icon. Regardless of the selected mode, the preview section consistently displays the input in encrypted form to ensure data confidentiality.
Smart scale configuration options
A new parameter, “AutoPredictItemOnStableScale”, has been added to control whether item predictions are shown automatically once a stable weight is detected on the scale.
A new value, SmartScale, has also been added to the existing “ShopAndGoCheckoutType” parameter, allowing stores to enable the new Smart Scale checkout mode.
POS Configuration
New parameter:
AutoPredictItemOnStableScale - Default value: True.
If True, item predictions are presented automatically once a stable weight is detected.
If False, PLU List opens and predictions are not displayed. Loss-prevention/check is performed in both cases.
Existing parameter:
ShopAndGoCheckoutType
New value: SmartScale
Scanning a Trumf loyalty QR code registers the Trumf ID on the receipt
Scanning a Trumf member's QR code from the Trumf app registers the Trumf ID on the receipt. Only one Trumf ID can be used per transaction, and the purchase can then count toward Trumf bonus.
Since Trumf only provides a loyalty number, the loyalty header shows only the ‘Loyalty Number’ and Delete options for Trumf members, keeping unrelated fields hidden.
POS Configuration
LoyaltyHeaderInSaleView and ShowMemberButtonsInLoyaltyHeader should be set to show only the Loyalty Number and Delete options for Trumf members.
Handling for parameter type: ConfigurableDialogConfig
In top section there is a standard element that contains tag and parameter name.
Under this section there is a table with several columns. Rows are predefined and user can't remove them or add new ones. To modify fields for selected row user needs to press edit icon. After pressing this icon user gets edit dialog.
In top row of the section there is a filtering row so user can easily find rows that he is looking for.
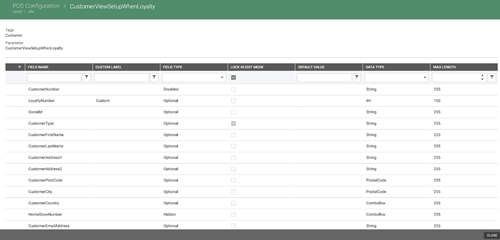
POS Configuration in Cloud
Improved 'Select All' functionality in store filter:
Location: System > POS Configuration > Configuration Groups, on clicking the name of the configuration group and selecting 'edit' under Stores,
Update Summary:
The behavior of the 'Select All' button within the Stores section has been improved to align with active filters.
Previous Behavior: Clicking 'Select All' would select all available stores, regardless of any filters applied.
New Behavior: With this update, only the currently filtered (visible) stores will be selected when using the 'Select All' button. This enhancement ensures more accurate and efficient bulk selection based on user-defined criteria.
Different surveillance sound for items that cannot be approved externally
New sound file for items that cannot be approved externally should be called AgeControlNotExternal.wav. It should be located where the other sound files already are (path is defined in MediaBankCacheFolder parameter).
When an age-controlled item that can be approved externally is scanned, AgeControl.wav plays. If it has not been approved externally by the time the customer goes to payment, the age-control dialog appears and AssistanceNeeded.wav plays.
When an age-controlled item that cannot be approved externally is scanned, the new AgeControlNotExternal.wav plays. When the customer goes to payment, the age-control dialog is shown and AssistanceNeeded.wav plays.
Fuel Integration - Print Receipt Copy
Print receipt copy functionality has been implemented in Fuel Panel:
last 20 receipts are shown
a scroll when there are a lot of receipts is being displayed
date format is related to language/culture
the receipts are sorted from newest to latest
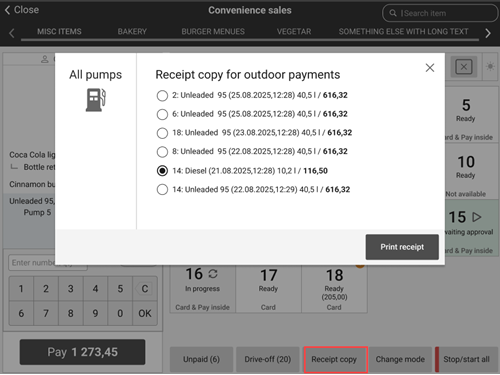
Unmanned mode control in POS
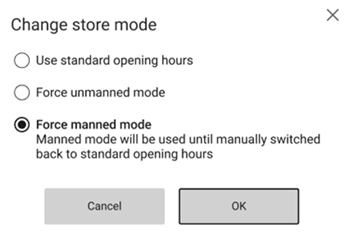
A button in the Sale view opens a dialogue for controlling Manned and Unmanned mode on the POS. The user chooses to run the POS in Manned mode, in Unmanned mode, or let the mode follow the configured opening hours. A forced mode stays active until the user changes the setting back to follow the opening hours.
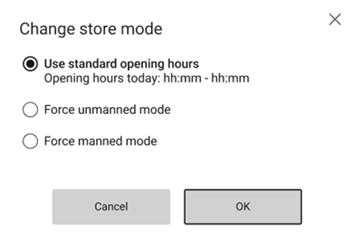
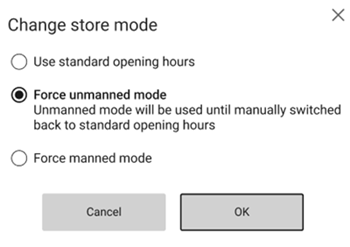
POS Configuration
Relevant existing parameter:
'SnGMannedOpeningHours' - configured opening hours for each day of the week
'ButtonConfig' - New function CHANGE_STORE_MODE may be programmed on a key in Sale view (only)
Customer receipt history
It was not previously possible to view a customer's historical receipts directly from the customer header, an option that already existed for members.
Users can now select the new "Sales" button in the customer header to view a customer's past receipts, when cloud receipt service is enabled (“ReceiptServiceUrl” parameter is set), and a new function (SEARCH_RECEIPTS_BY_CUSTOMER) is now available in “ButtonConfig” for assigning to the buttons as needed.
Improvements
Import of POS unit using an Excel file (RTP-46223)
POS admin can now import POS unit using an Excel file via an “Import” dialog using the POS Management.
Enabling export of POS Units via Excel (RTP-46222)
Added the functionality to export the POS units from POS management via excel
Hide edit buttons when user doesn't have permissions (RTP-39520)
When user only has “View configuration” permission in User management, then edit and remove buttons are not shown.
After clicking 'See details' next to complex parameters (SignalLightConfig, ClickAndCollectMessageconfig), currently set values are shown, but it is impossible to edit them.
Open/Close animation of hierarchy panel and activation marker update (RTP-38500)
Updating and persisting the left/right hierarchy panel open/closed state across reloads and making the expand/collapse animate correctly in both directions. It also reworks the pending-activation markers, so they still position correctly when the panel starts collapsed.
Displaying orders along with associated receipts
This PR adds an Order tab and wires up UI interactions between the new Orders tab and the existing Receipts tab along with filtering of the receipts
NorwegianTollQuotaGroups parameter changes (RTP-45215)
“NorwegianTollQuotaGroups” parameter in POS accepts both ‘dot’ and ‘comma’ as a decimal separator, so that quota in POS is correctly calculated. This decimal separator change only affects this one parameter. Other are unchanged.
Self-service - "Find item" search (RTP-42724)
Behavior of "Find item" search in self-service depends on the new “DefaultPluListAppearance” parameter.
Parameter in POS Configuration:
“DefaultPlulistAppearance parameter” (default value: Grid). This configures the default PLU list appearance when "Find item" is used in self-service.
Required: Chain Web version 2.10.410 or higher !
Improved 'Select All' in store filter (RTP-39139)
In System > POS Configuration > Configuration Groups > Edit Stores, the Select All button selects only the stores visible based on the active filter. This makes it easier to bulk select stores that match your search or filter, instead of selecting all stores.
Handling of a parameter type to enable POS configuration updates (RTP-37885)
Users should now be able to add and update the POS configuration parameters using a structured user interface.
POS Configuration - ButtonConfig new function (RTP-39417)
It is possible to configure new function button called “Check Voucher Balance”. Thanks to it access to checking voucher balance feature will be available after clicking a button.
ButtonConfig - configure Complaint button (RTP-40462)
A "Handle complaint" button is available in POS. It appears in Finished Receipt View and POS Receipt Journal to manage complaints directly from receipts
Description updates and location changes (RTP-36903)
The parameter descriptions were updated and moved from the database to resources files for better access.
Coop Loyalty card Registration in ARTS POSLog (RTP-45434)
When a Coop loyalty card is scanned at checkout, the loyalty card number is stored in the ARTS POSLog (POSLog.XML).
This ensures that the transaction includes the correct loyalty information and that the customer receives the expected discount.
POS Configuration - new parameter (RTP-43632)
New parameter called “ActionCodeServiceOrder” has been added. Default value: blank. The action code numbers configured in this parameter determine if the created Service Order has status Active or Done.
POS Configuration - PayTerminalType options (RTP-45153)
"AeroNexo" has been added as an option to configure in parameters using “PayTerminalType” as parameter type.
Thanks to it a new bank terminal integration will be possible to use in POS.
Select Item from Receipt for Complaint (RTP-45479)
After a cashier scans a receipt or searches for a receipt number, all items from that purchase appear in a clear list. The cashier selects the item the customer wants to complain about.
This makes it easy to find the correct item and ensures the complaint is linked to the right purchase.
POS Management - POS API Receipts (RTP-50177)
Introducing a new page which can be used to check POS API receipts.
Handled the errors for non numeric store number (RTP-52113)
Fixes a SQL join to use the numeric store number to avoid conversion errors for non-numeric ‘ExternalNumber’ values and prevents duplicate configuration-set inserts.
Released 6 March 2025
Fix for inconsistent language (RTP-36237)
When language was changed in other modules like Travel Management, the same language is used in POS Management.
Release 26 August 2024
Reason codes for log out in POS
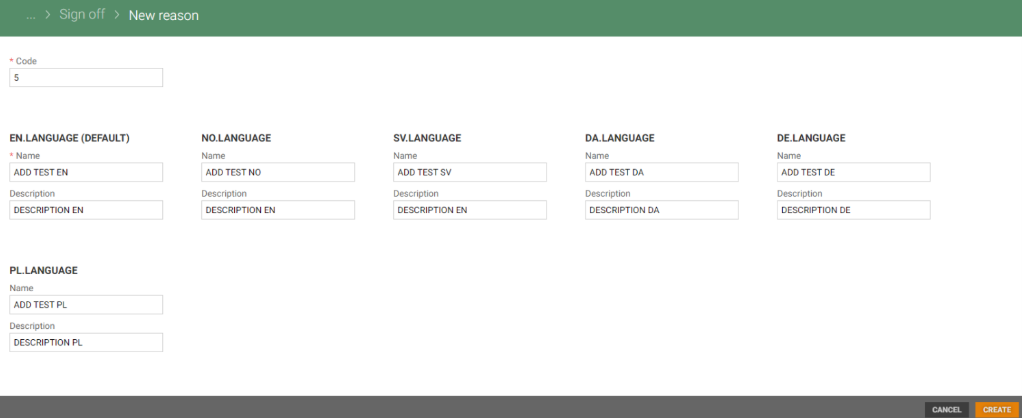
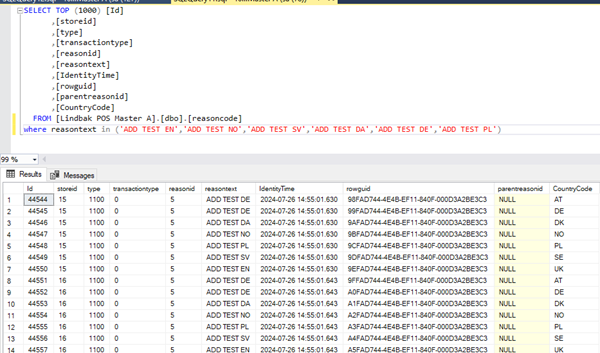
Reason codes for logging out of POS can be configured in POS Management.
When reason codes for logging out have been configured, the cashier in POS has to supply the reason for logging out.
Format of store number for profile prices from Item Management to POS Master (RTP-32125)
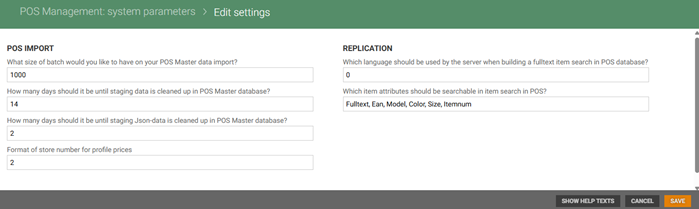
ProfilePriceStoreNumberMask has been added to System parameters. This is used to configure the format of the store number to be used when importing profile prices.
Release 11.06.2024
System parameters for POS Master database and POS Import
System parameters that affect behavior of data transfer via POS Import to the POS Master database can be maintained in the POS Management module.
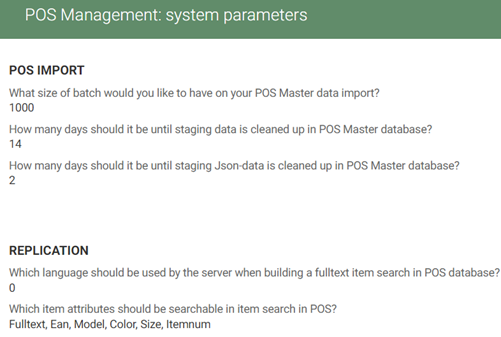
When a parameter value is changed, the changes are exported to a blob and imported to staging.FlatJSON table in POS Master. Then they are processed into the configuration keyvalue.
Release 25.04.2024
Fixed missing column data and difference between main view and sub view (RTP-28815)
A problem caused by time zone has been fixed so the main view and the sub view for a specific import table show the same and the correct lines.
Release 05.03.2024
System parameters
The system parameters view in POS Management can be used to configure POS Server applications. (Previously, this configuration was set in the legacy POS Manager application.)
Monitoring of POS Master data import
Import of data in cloud POS Master database can be monitored in POS Management.
The main view shows the number of rows per status in each staging table:
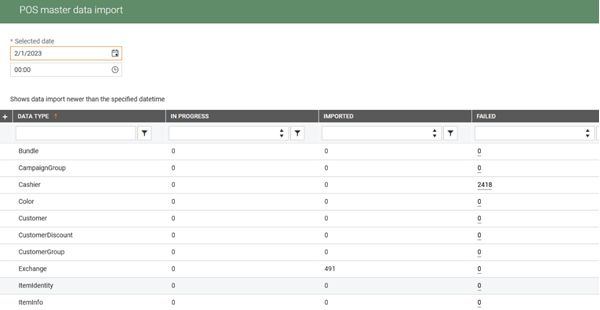
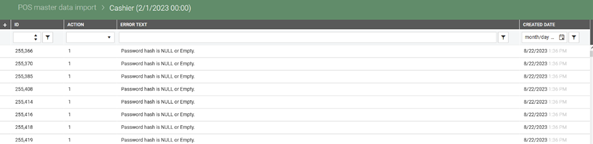
The number in the failed column can be clicked to open a sub-view that shows the reason why the import of the rows failed.
Example from cashier import:
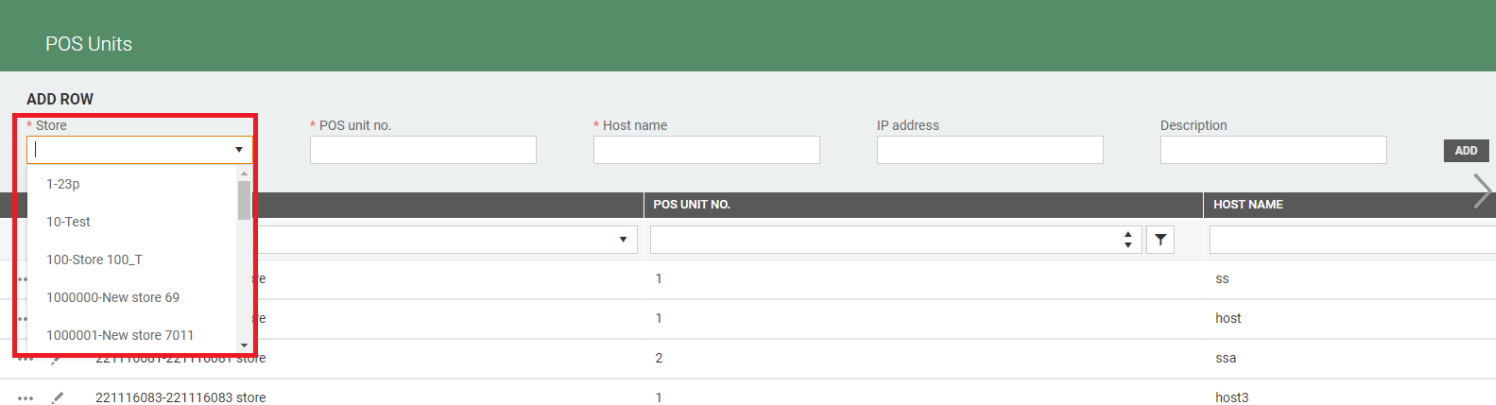
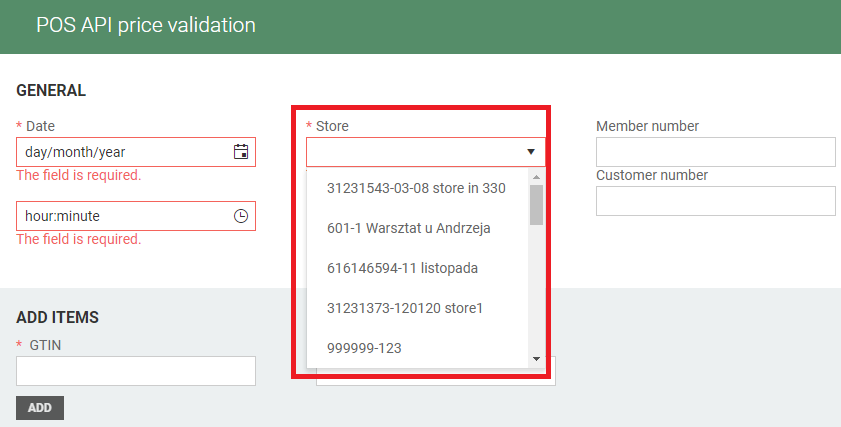
Improvement of search in drop-down fields
When user has access to one store, there is no Store field in POS Units and Price Validation. This one store is set automatically.
POS Units:

POS API price validation:
When user has access to more than one store, there is Store field available with store list possible to choose.
POS Units:
POS API price validation:
Automatic export of default pos units for new stores (RTP-26157)
Existing default POS Units are exported automatically when a new store is created and imported from Store Service.
Angular 16 in POS Management (RTP-27325)
Angular has been updated to version 16 in POS Management.
Reason codes for transaction/subtotal discount (RTP-28224)
Reason codes for transaction/subtotal discount can be configured in POS Management.
ℹ️ Required
EG POS version 4.0.0.146 or later is required to use these.
Fix for missing data in some columns (RTP-27326)
Missing data in some columns in the monitoring of POS Master data import has been fixed. All columns are filled with data except when the column in the staging table has the value NULL.
Release 17.11.2023
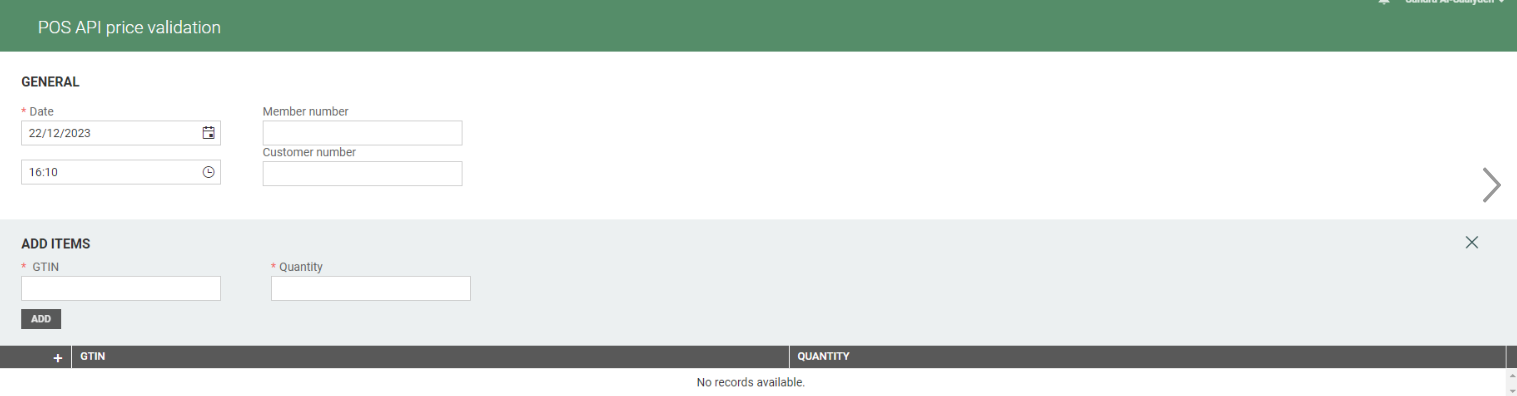
POS API Price Validation
The POS API Price Validation tool can use used to verify that future campaigns has been transferred correctly and updated in the POS API database.
To calculate prices, the user needs to specify:
list of items
date/time for calculation
store
and optionally a member or customer
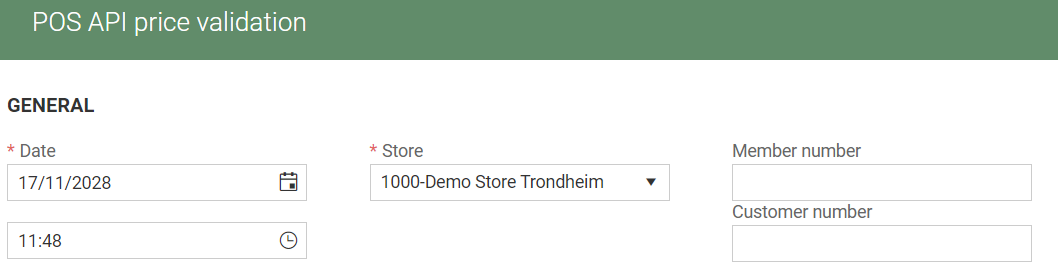
The result of the price calculation will be shown after clicking "Calculate", and it is also possible to download the cart content to view the data in detail.

Maintenance of POS Units
Adding new and editing existing POS units can be done in the POS Management module.
There are 2 types of POS Units that can be added:
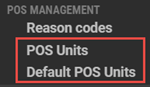
Default POS Units are virtual POS'es used by the POS API. These are common for all stores.
POS Units are physical cash registers deployed in stores. These are created per store.
To add a new POS Unit in a store, specify the store, pos unit number, etc.:

Existing POS units can be seen in the table and they can be deactivated if they are permanently of temporarily out of use.
ℹ️ Import of POS units in Chain Web from POS Management is not yet implemented. POS units must therefore be created both in Chain Web and in POS Management. The export job for POS units in Chain web should be disabled when using POS Management to maintain pos units.
Released 08.09.2023
Maintenance of reason codes
Reason code configuration, including optional support for multiple languages can be performed in POS Management.
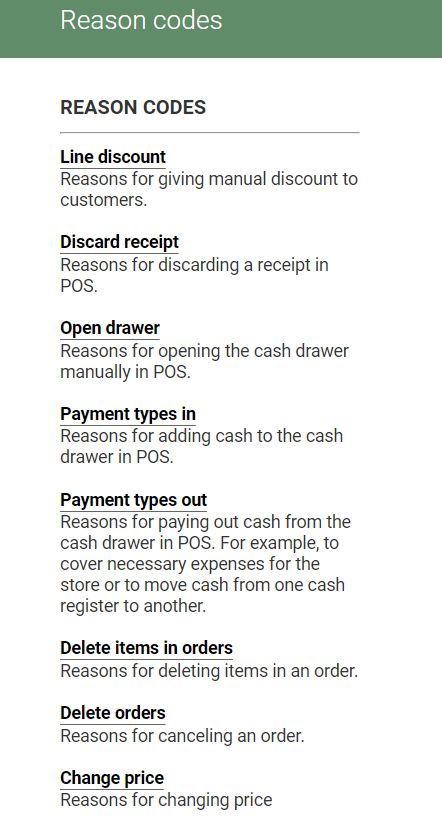

User roles "View Reason Codes" and "Manage Reason Codes" control which users have permission to see and edit these reason codes.
In a multi country setup, texts for all defined languages will be exported from POS Management and imported in POS.
POS will use the language for the country configured on the the store's profile in Store Management.
Example: If store X belongs to profile Y, and profile Y is set to country "Norway", then the cash registers in this store X will show reason codes in Norwegian.
ℹ️ When migrating from reason codes in Chain Web, existing reason codes defined in Chain Web should be deactivated. Codes with matching numbers should be created in POS Management.
Roles and permissions (RTP-23553)
User roles can be defined with permissions for viewing/editing POS Units and Default POS Units.
ℹ️ Maintenance of POS Units is not yet fully released
Default POS Units (RTP-23554)
Default POS units can be viewed, added, edited and activated/deactivated. Adding and editing new default POS Unit is restricted by validation: number must be between 900 and 999, and has to be unique; also host name must be unique across all stores. All data regarding default POS Units is stored in the EG POS Module database (in the Chain.PosUnit table).
Default POS units is automatically created per store.
ℹ️ Maintenance of POS Units is not yet fully released