This page includes information on membership integration with EG Loyalty.
Register a new member
This procedure is used to register a new member (in the integration between EG POS and EG Loyalty).
Select New member.
The Member registration dialogue box is displayed. (You can configure which fields to display and whether the fields are mandatory to complete (an asterisk * will be displayed after the field name if the field is a mandatory field)).
.png)
Register a member by completing the fields in the dialogue box. If a field is mandatory, an * is displayed after the field name.
Press Save to save the information. When you press Save, the member is created.
The sales view will be displayed. The name of the member is displayed at the top of the view.
.png)
Complete the sale as normal.
Member card reminder
The cash register can be configured to display a member card reminder when you go to the payments view. This is shown only if the member has not been registered.
Register member without validation
A member can be registered without validation/lookup in the customer club.
Select the “Add member offline” function.
The “Member number” dialogue box is displayed. Enter the member number and press OK/Enter.
.png)
The member number is registered in the sales view (the member is added without being validated first).
Register member via the customer screen
Customers can register as a member via the customer screen.
.png)
Phone number already registered
The customer enters their mobile phone number on the customer screen and presses the Register button.
If the mobile phone number is already registered, the member is added to the receipt.
Phone number not registered
If the mobile phone number is not already registered, a lookup will be performed against the address provider (where this is configured). The available information is retrieved in the “Register in customer club” screen.
.png)
If the mobile phone number does not exist, the “Register in customer club” screen opens.
Information about the membership terms is displayed on the screen. The membership terms must be accepted before the member can be registered.
The customer completes the registration form (mandatory fields are marked with *). When they have finished completing the form, the customer must press the Register button.
The member is created and added to the receipt.
.png)
Display member information
When the member is registered at the cash register, you can see member information in the sales view and on the customer screen. The information that is displayed depends on the configuration.
.png)
Tap the member at the top of the screen to display more information and to access functions for editing or removing a member from the receipt.
.png)
Search for member
You can perform a free-text search for members in EG Loyalty.
Select Member in the search menu.
Enter the search string in the input field and press Enter.
.png)
The search results are displayed on the left of the screen. Select the required member and press OK/Enter.
.png)
The member will be registered in the sales view.
We do not recommend searching for single characters (letters, numbers, symbols) when searching for members.
Search for member using identifier
You can use the “Search for member” function to add an existing member. Here you can search by mobile number, member number or e-mail address, for example.
Select the “Search for member” function.
The “Search for member” dialogue box is displayed. Tap the arrow keys to select an identifier.
Enter the identifier (such as the mobile phone number).
.png)
If the member is found, the member will be added to the receipt.
.png)
If the member is not found, a message is displayed informing you of this. You will be asked if you want to create a new member. Tap Yes to create a new member and the member registration dialogue box will be displayed.
.png)
Add/edit member using identifier
Edit member
You can edit member information after adding a member to the receipt.
Select the Add/Edit member function and the “Add/Edit member” dialogue box is displayed.
Select an identifier and search for the member.
.png)
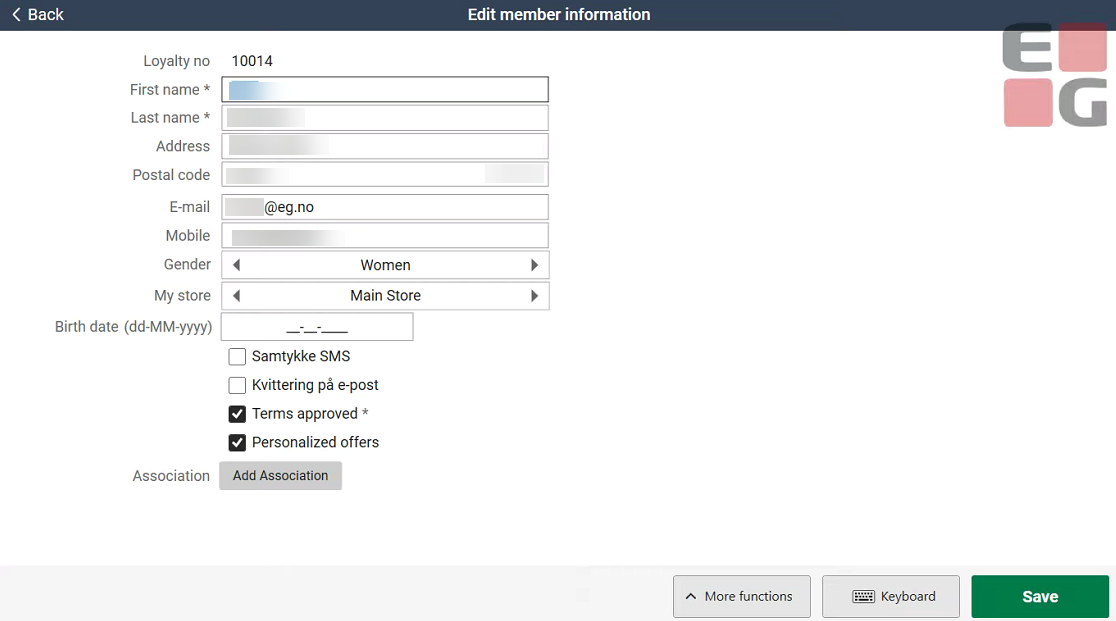
The “Edit member information” screen is displayed, with the fields completed.

You can edit the member information. Tap Save to save your changes.
If you tap Back, a dialogue box is displayed asking you to confirm that you are sure you want to cancel. Tap Yes to cancel or No to continue.
.png)
New member
Select the “Add/Edit member” function and the “Add/Edit member” dialogue box is displayed.
Select an identifier and search for the member.
The “Member registration” screen is displayed. If there is a match in the lookup against the address provider (where this is configured), the fields are already completed.
.png)
You can edit this information.
Tap Save to create a new member.
Add member manually
Add member manually
Select the “Add/Edit member” function and the “Add/Edit member” dialogue box is displayed.
Select an identifier and search for the member.
If there are no hits when you search for a member, the “Register new member manually” screen is displayed.
.png)
Register the member manually.
Tap Save to create the member. The member is created and added in the sales view.
Select association
A member can be affiliated to several associations. The sale can only be linked to one association, however. If the member is affiliated to several associations, you can choose which association to link the member purchase to.
Register the member. The member is affiliated to more than one association.
A dialogue box is displayed for you to select the association.
Select the association to link the sale to.
The selected association will be linked to the sale.
.png)
Optional coupons
If the member has optional digital coupons available, a dialogue box is displayed for selecting coupons. The dialogue box is displayed when the cashier goes to the payments view.
Optional coupons on the cashier’s screen
The member is registered, and the sale is registered as normal.
The cashier goes to the payments view to complete the sale.
The “Customer has unused coupons” dialogue box is displayed.
Tap to select the coupons that the customer wants to use. The selected coupons are marked with a green tick.
.png)
Tap Confirm to use the selected coupons. The coupons are added.
Tap Do not use coupons if the member does not want to use the coupons.
Optional coupons on the customer screen
When the cashier goes to the payments view, the “Select coupons to use now” dialogue box is displayed on the customer screen.
The member selects the coupons they want to use. The selected coupons are marked with a green tick.
.png)
The member then taps Use selected coupons. The coupons are added to the screen.
If the member does not want to use coupons for this purchase, they should select Save coupons for later.
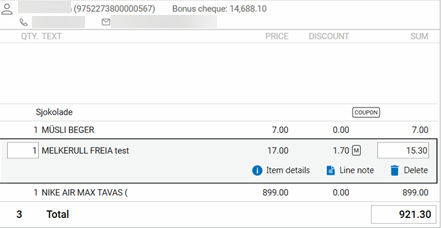
Example of a sales view when a coupon is registered:

Post-register a member on a finished receipt
This function is used to post-register a member on a finished receipt.
Scan or search for the finished receipt. The finished receipt will be displayed in the sales view with the text “Finished receipt”.
.png)
Select the Post register member function. The text “Post register member on finished receipt” is displayed at the top of the sales view.
.png)
Select Member in the search menu to open the member search. Search for the member and select the appropriate one.
The “Confirm registration” dialogue box opens. Press OK. The post-registration of the member is complete.
.png)
.png)