The PLU list is created in POS Configuration and can be used for selling items. In POS Configuration, you can configure which PLU page is to open.
The PLU list is an electronic list that helps you to find the correct PLU more quickly. You can then select the item that you want.
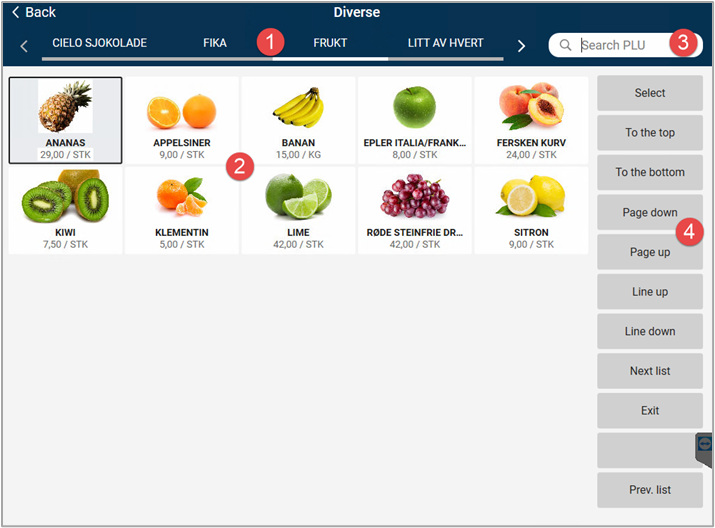
Below is an example of what a PLU list could look like.

The numbers on the image correspond to a description below of the different elements of the PLU list.
Buttons for PLU pages – Us these buttons at the top of the screen to select a PLU page. A PLU list can have multiple pages. The page selected is indicated by the button being highlighted in a different color. To open a different PLU page, simply tap the name of the PLU page you want. This opens the selected page and displays the items it contains.

PLU button – Each button is linked to an item. The button displays the EAN/PLU number, item text, and price (the button can also contain text only; you can specify this when creating the PLU list).
Search – There is a search box at the top right of the screen. You can use this to search for items in the PLU list. You can search for item text, EAN/PLU number, and price. The search includes all the pages contained in the PLU list. Items in the PLU list that contain the specified search string are displayed. Only pages with hits are shown at the top. If you want to see the hits on a different page, simply select that page.
Function buttons – On the right-hand side of the screen are buttons that you can use to navigate the PLU list, close the PLU list, and select items. These buttons are configured in POS Configuration. The following function buttons are available:
To the top – moves the focus to the first item in the active PLU list.
To the bottom – moves the focus to the last item in the active PLU list.
Page down – scrolls down an entire page in the active PLU list.
Page up – scrolls up an entire page in the active PLU list.
Line up – scrolls up a line in the active PLU list.
Line down – scrolls down a line in the active PLU list.
Select – Adds the item that is the focus on the receipt; the item will be registered in the sales view.
Next list – displays the next PLU list.
Previous list – displays the previous PLU list.
Exit – Closes the PLU list view and returns to the sales view without any items being selected.
Select an item via the PLU list
Select the PLU list function. The PLU list is displayed. Select the page you want at the top.
Select an item using the function buttons on the right or using a keyboard (arrow keys up/down and Page Up/Down). Confirm by pressing OK/Enter or tap Select.

If the cash register has a touch screen, tap the required item.
When the item is selected, the PLU list closes, and the item is added to the sales view.
Select multiple items from the PLU list
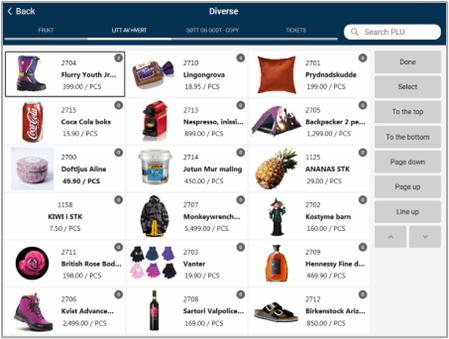
Where this is configured, multiple items can be selected from the PLU list and added to the receipt at the same time.
Several of the same item or different items from the PLU list can be selected in the same purchase.
Select all the required items.
Select Done to close the PLU list. The items will be added to the sales view.

Search for items in the PLU list
You can search for items in the PLU list by entering search text in the search box in the upper-right corner of the screen. You can search for item text, EAN and price.
Enter the search text and press OK/Enter to search.
Items in the PLU list that contain the specified search string are displayed.

To view hits from a different list, simply select the list you want. Pages that do not contain any hits are not shown at the top.
Press Esc/C when there is text in the search box to reset the search (the search text is removed). If you press Esc/C when the search box is empty, the PLU list will close.
Search for items at cash registers without keyboards:
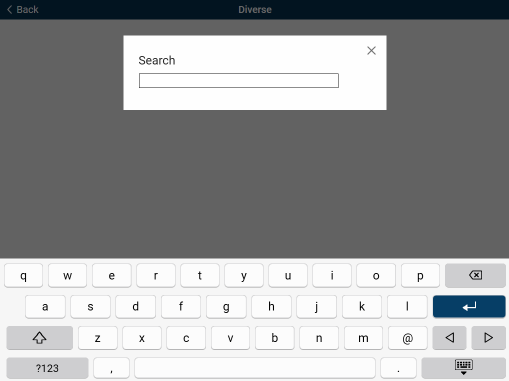
Parameters are used to control whether the on-screen keyboard is to be activated at cash registers without a keyboard (cash registers with a touch screen).
This displays the on-screen keyboard at the bottom of the screen, as well as a dialog where you can enter search text.

Enter your search text and press OK/Enter to search.