Edit finished receipt
This function allows you to do a correction on a finished receipt.
Correcting previously finished receipts
Scan the receipt or search for a finished receipt.

Select Receipt correction. If the receipt can be found and editing is permitted, the original receipt will be voided. A return receipt will be printed.
A new receipt containing the same item lines as the original receipt will be created automatically. The new receipt will be shown in the sales view. The input sum for cash is automatically set to be equal to what was entered for the voided receipt.

The receipt when it is recreated in the sales view, and a line discount has been issued
Edit the relevant item lines in the receipt and, if applicable, add any new item lines.
Go to the payments view to finish the receipt by pressing OK.

Correct last receipt
Select Receipt correction.
The method is the same as for correcting previously finished receipts (see description above).
Cancel finished receipt
This function allows you to cancel a finished receipt.
Select Cancel finished receipt.
A dialogue box is displayed where you can enter the store number, cash register number and receipt number or scan the receipt you want to cancel. Press OK.

The receipt will be retrieved in the registration view. The items on the receipt will be recorded with a negative amount.

Press OK to go to the payments view.
Finish the receipt in cash (without entering the amount).
You can also use this function by scanning or looking up the finished receipt and then selecting Cancel receipt.
Delete receipt
This function deletes the active receipt. The function is access controlled. All deleted receipts are stored in the system.
Select Delete receipt.
Select OK to delete the receipt.

The receipt that is printed will contain the text Deleted receipt at the top of the receipt.
Place receipt on hold
A receipt can be paused/placed on hold, if necessary, for example when waiting for the customer to collect more items.
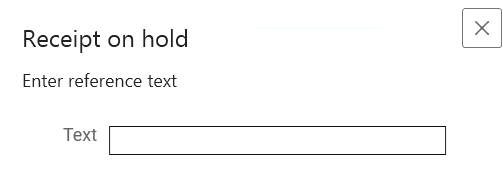
Select Place receipt on hold while in a sale.
Enter a reference text (can be left blank). This text can be used to look up the receipt again.
Press OK to save.
The receipt has been placed on hold and can be retrieved at any cash register by any cashier, provided that the cash registers are online. Placing receipts on hold is rights-controlled at cashier level.
Retrieve receipt on hold
A receipt on hold can be retrieved at any cash register by any cashier, provided that the cash registers are online.
Receipts on hold can be retrieved in a number of ways.
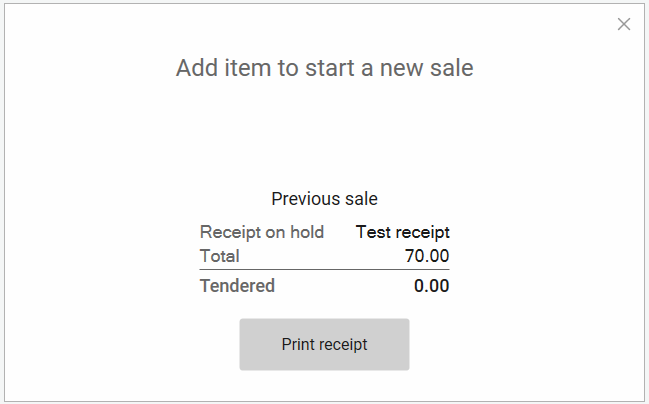
If the cashier has receipts on hold, a shopping trolley icon and the number of receipts is displayed at the top of the screen. You can then tap the shopping trolley icon to retrieve receipts on hold.

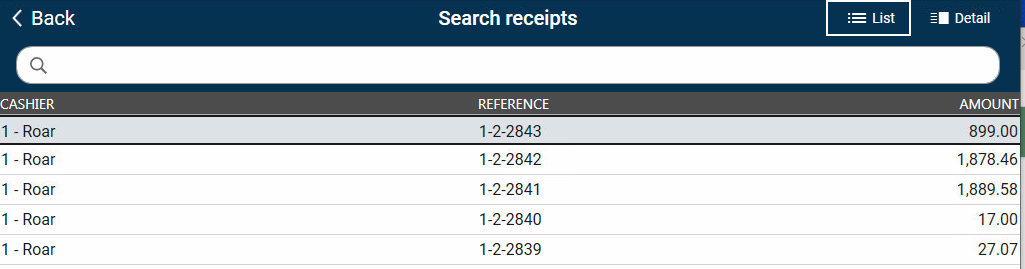
Search receipts on hold
Tap Receipt in the search menu.
Enter the reference text or parts of the reference text in the search box at the top of the screen.
Select the required receipt (if several are displayed), followed by OK.

The receipt will be displayed in the registration view and the sale can continue.

Overview of all receipts on hold
Select Receipt in the search menu and press OK. The “Search for receipt” dialog opens.

Select “Get receipts on hold”.
An overview of the receipts on hold is displayed on the screen. Select the required receipt, followed by OK.
Search for finished receipt
This function enables you to search for finished receipts.
Select Receipt in the search menu on the left of the sales view and press OK.
Select Search for finished receipt.

Enter the store number, cash register number and receipt number of the receipt you want to search for.

The receipt will be displayed in the sales view with the text “Finished receipt”.
Receipt note
This procedure adds text/notes in the notes field of a receipt.
Select the Receipt note function.
Enter the required text and press Enter.

The text will be added as information at the top of the receipt.

If you want to edit or delete the text, you can tap the receipt note at the top of the screen. This displays the Edit and Delete buttons.

Select Edit if you want to edit the text. Make the necessary changes and press Enter.
Select Delete to delete the receipt note.
Line note
This procedure adds text/notes associated with an item line.
Tap the relevant item line.
Select Note.

Enter the required text and press Enter.

The text will be added as information below the relevant line in the receipt.

If you want to edit or delete the text, you can tap the item line again and select Note again. Make the necessary changes and press Enter.
Registration of customer on receipt
Select Customer in the search menu on the left.

Enter the customer number or customer name (all or part of the name). Press OK/Enter to search for the customer.
The search results are displayed on the screen. You can choose to view the search results as a list or in detail view.

Select the correct customer and press OK/Enter to select that customer.
The customer name will be added to the top of the sales view. If you tap the customer name, you can see more details and available functions.

Delete customer from the receipt
Tap the customer name at the top of the screen.
Select Delete to delete the customer.

Copy of receipt
You can retrieve/print a copy of the last receipt as well as the n number of last receipts and previously finished receipts.
Copy of last receipt
This function prints the last receipt.
Select Receipt copy.
Select the desired receipt copy type. A copy of the last receipt will be printed.

Copy of n last receipts
The Get n last receipts for receipt copy function retrieves a list of the last receipts recorded. The number of receipts displayed is controlled by parameters.

Select Receipt in the search menu on the left of the sales view and press OK.
Select Get n last receipts for receipt copy.
A list of receipts will be displayed in Receipt info. Select the required receipt and press OK.
Select Receipt copy type. The receipt copy will be printed.

Copy of previously finished receipt
It is possible to print a copy of a previously finished receipt. There are several ways in which this can be done.
Scan finished receipt:
Scan the receipt. The receipt will be displayed in the sales view.
Select Receipt copy.
Select the receipt copy type. A copy of the receipt will be printed.
Search for finished receipt:
Select Receipt in the search menu and press OK. A dialogue box containing receipt search options is displayed.
To locate a finished receipt, select the Search for finished receipt button.

A dialogue box is displayed where you can either enter the store number, cash register number and receipt number or scan the finished receipt. If the receipt is found, it will be displayed in the sales view.

Select Receipt copy to print a copy of the receipt.
You can configure the “Get receipts on hold by search type” function to open with a specific search type (on hold, receipt copy or finished receipts).
Select printer for receipt copy
When you print a receipt copy, a dialogue box may be displayed in which you can select the printer after you have selected the receipt copy type.
You can choose whether to print using the receipt printer or A4.
