The Import details screen has the same structure as the Item screen.
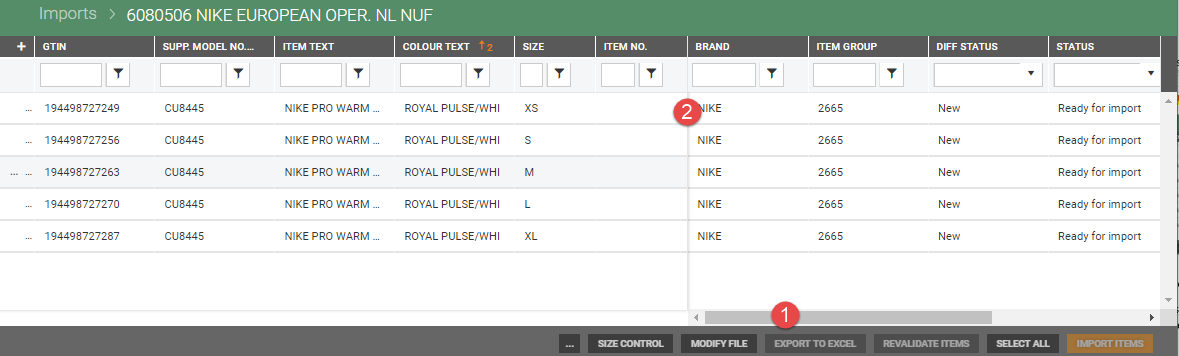
The columns on the left of the screen are locked and are always displayed. The remaining columns are displayed on the right, with a horizontal scroll bar at the bottom of the screen below the columns (1).
You can use this to scroll across and display further columns. A grey line (2) on the screen separates the locked columns from the other columns.
You can choose which columns are displayed (using the column selector, +, at the top left of the screen) and choose where they are positioned by moving columns. For a more detailed description, see Display.
Among other things, the screen displays the import validation status and any validation errors.
You can choose whether to import all the items (there is a separate function for this) or only some of the items. Click on a line to select it. To select multiple lines, press and hold “Ctrl” while clicking on several lines.
There are several functions at the bottom of the screen that can be used to manage the file. Most of the functions are disabled until you select one or more items. A description of the functions is provided below.
Functions on the item line
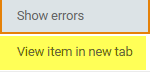
To the left of the item line you can find the “more” button. Click on this button to display functions that provide more information about the selected item. Select the required function.
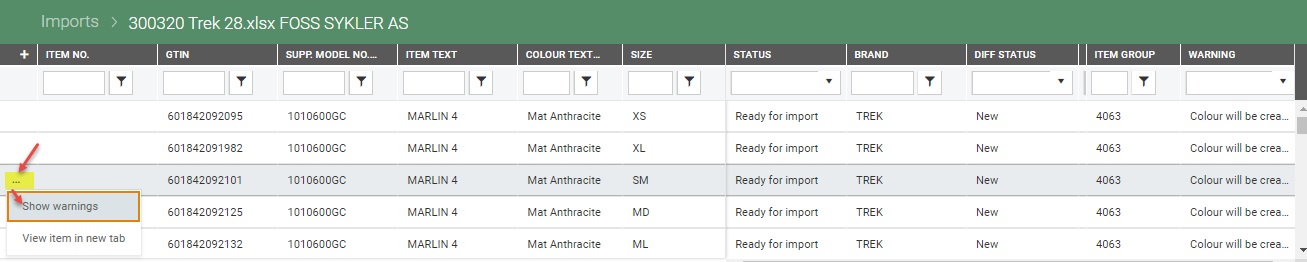
Show warnings
If the item has warnings, you can click on the “more” button and select “Show warnings”.
This opens the “Warnings” dialog, which contains information about the warning and the item it applies to.
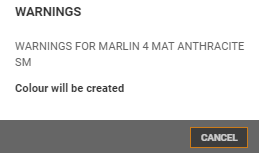
Click on Cancel to close the dialog.
Show error messages
If the item has error messages, you can click on the “more” button and select “Show error messages”.
This opens the “Validation errors” dialog, which contains information about the error and the item it applies to.
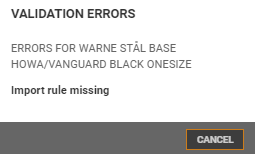
Click on Cancel to close the dialog.
View item in new tab
Click on the “more” button and select View item in new tab to open the item details screen in a new tab.
This is the same screen as the one that opens when you choose to view item details on the Items screen.
Functions on the import item details screen
“More button”
Additional functions are available via the “more”  button. Click on the function you require to select it. The functions available depend on the status of the import file.
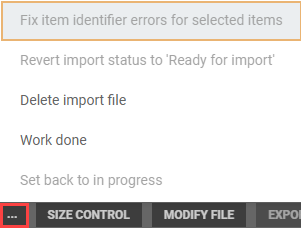
These functions are described below.
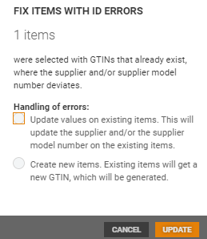
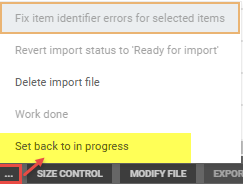
Fix item identifier errors for the selected items
If an item has an ID error, information about this is displayed in the Validation error column. In this case, you can use the “Fix item identifier errors for the selected items” function.
Use this function if there are items with GTINs that already exist in the item register (item master), where the supplier and/or supplier model number deviates.
Choose how to manage the ID errors by selecting one of the following options:
Update values on existing items. This will update the supplier and/or supplier model number on the existing items. Select this if the values in the PRICAT file are correct and the item attributes are to be imported.
Create new items. Existing items will be given a new GTIN, which will be generated. Select this if the items from the PRICAT file and the items in the item register are to be treated as separate items.
Revert import status to “Ready for import”
You can reset the status of an imported file to “Ready for import”.
Click on the “more” button and select Revert import status to “Ready for import”.
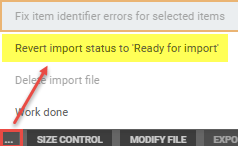
This function is only available if the file has the status “Imported” or “Partially imported”.
This is a useful function if you need to update the same items again because the previous update contained incorrect data.
Delete import file
You can delete the import file by clicking on the “more” button and selecting Delete import file.
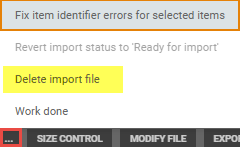
When you select this function, the “Delete import file” dialog opens. You must confirm that you are sure you want to delete the import file.
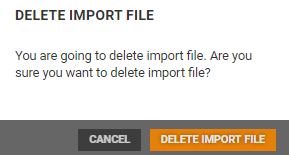
Click on Delete import file to delete the file.
You can only delete files with the status “New” or “Ready for import”.
If any of the items in the file have been imported, the “Delete import file” function is disabled.
Work done
You can apply a filter on the Import screen to see which files have been done/not done. Files that have not been done are displayed by default.
You can mark files as “Done” manually from Import details.
Click on the “more” button and select Work done.
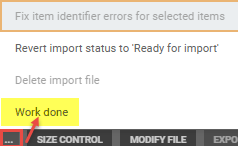
The “Work done” dialog opens.
This displays a warning that you are about to set the import to done. You must confirm that you wish to do this.
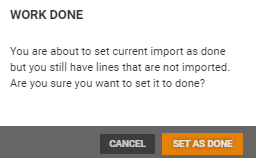
Click on Set as done to mark the file as done.
(Done) is displayed after the file name/supplier at the top of the screen.
Set back to in progress
You can revert a file marked as “Done” to in progress.
Open the file.
Click on the “more” button and select Set back to in progress.
Functions in bottom view
.png "image(62).png")
Size control
Use the “Size control” function to see which sizes already exist for the items in the file.
Click on the Size control button. An overview of the sizes that exist for the item is displayed on the “Size control” screen.
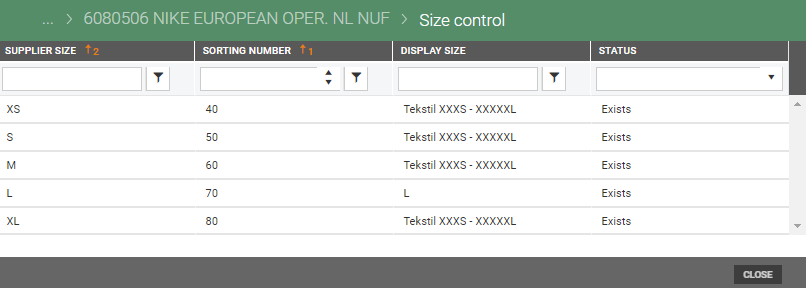
Click on Close to return to Import details.
Modify file
If you have changes to items in an exported Excel file, you can use the “Modify file” function to upload your changes.
Click on the Modify file button.
The “Update items from file” dialog opens.
Click on Select file to open the Select file screen. Select the Excel file containing the changes (the file must be in .xlsx format) and select Open.
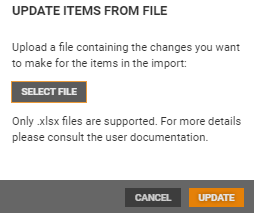
Click on Update to update the file. The changes will be applied.
Export to Excel
You can export items to Excel, to validate the file manually for example. The “Export to Excel” button is only enabled if one or more item lines are selected.
Select the items to export, either by selecting multiple item lines or by clicking on the “Select all” button (this selects all the items on the screen). You can also use filters to select the items you want to export.
Click on the Export to Excel button.
The “Export to Excel” dialog opens. The number of items that will be exported is displayed here.
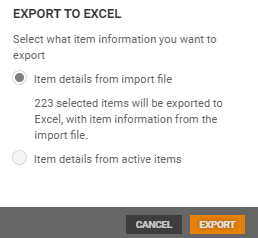
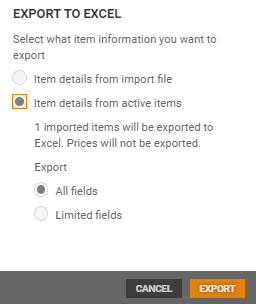
Select the information source by choosing from the following two options:
Item details from import file – Information will be displayed showing how many items from the import file will be exported to Excel.
Item details from active items – Information will be displayed showing how many imported items will be exported to Excel (the item already exists in the item register). Select whether you want to export “All fields” or “Limited fields”.
Click on the Export button to export the items.
The Excel file is exported and is displayed at the bottom left of the screen.
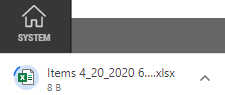
You can open the file by clicking on it. The file opens in Excel.
Revalidate items
Reject items
You can use the "Reject items" function to set the 'Reject' status on rows that were not imported in the Import detail's view.
Rejected rows are hidden by default and can be seen separately from active rows when the Status filter is set to 'Rejected'. Rejected rows cannot be imported directly but they can be revalidated and then imported.
Select the row(s) that you want to reject.
Click on Reject items, the "Reject items" dialog opens.
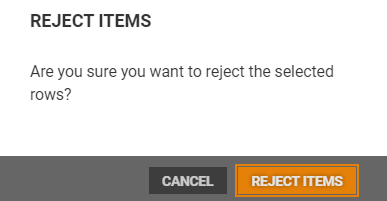
Click on Reject items to reject items.
Select all
The “Select all” function selects all the item rows. Use this if you want to process all the items in the file. The buttons for the other functions are enabled and these functions are applied to the selected lines.
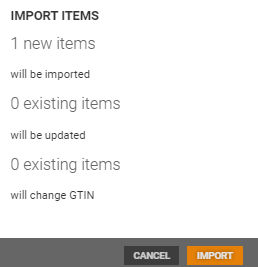
Import selected items
You can choose to import only some of the items into the file. Select the items you want to import.
Click on the Import selected rows button. The “Import items” dialog opens.
This displays information about the number of new items and existing items that will be imported and the number of existing items that will change GTIN.