Transaction basics
Most transactions in the app follow the same pattern. You open a transaction, add items, review a summary, and submit. This page describes the user interface elements and flows that are shared across transactions. The transaction-specific pages only cover what is unique to that transaction.
The transaction page layout
Every transaction page has:
A header at the top with the transaction name in the center, an X (close) button on the left, and a more (…) button on the right that opens the transaction options — see The more menu below.
A progress bar below the header, with one dot per step. The current step is shown with a large green dot; completed steps are small green dots; upcoming steps are small grey dots.
The main content for the current step.
A bottom bar with the step’s controls. On the first step this is typically a scan icon, a search icon, and a Next button. On the finish step it is Back and Submit.
Some transactions show a Total row below the progress bar with the item count and, for priced transactions, the total price. The total can be hidden via Hide total in the more menu.
Adding items by scanning
Tap the scan icon in the bottom bar. The scanner opens. See Scanning an item for how the scanner behaves.
When a barcode is recognized, the item is added to the transaction.
On devices with a hardware barcode scanner (such as a Zebra device), press the device's Scan button instead — the scanned barcode adds the item directly without opening the camera scanner.
Adding items by searching
Tap the search icon in the bottom bar. A search bottom sheet opens (named Add item or Search items depending on the transaction).
Type in the search field. The list narrows as you type and shows a result count (for example, 100+ items).
Tap an item row to add it to the transaction.
Tap the info (i) icon on the right of a row to open the item preview instead of adding it directly.
Tap the X in the top-right to close the search sheet. If the search sheet was opened from a transaction’s start page, closing it returns you to the start page.
The item preview
The item preview is a simplified version of the Item details page shown as a bottom sheet. It opens when you tap the info (i) icon on an item row in the search sheet.
The preview shows the item’s image, item number, name, price, variants (color and size), and a short Details section. A green + button sits to the right of the variant drop-downs.
Tap the + button to add the item. A confirmation popup asks “‘<item name>’ will be added to the <transaction name>.”
Tap Add item to confirm or Cancel to go back.
Tap the back arrow in the top-left to return to the search sheet, or the X to close everything and return to the transaction page.
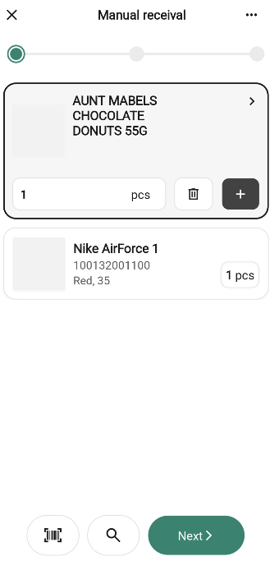
Item rows with quantity
Most transactions show each added item as a row on the transaction page with a quantity field on the right. These rows share a few behaviors.
One row is focused at a time. The most recently added or tapped row is focused. The focused row is outlined with a thick border, and its quantity controls are expanded. All other rows collapse and show only a small quantity badge (for example, 4 pcs) on the right.
Tapping a collapsed row focuses on it and collapses the row that was focused before.
Open item details from a row
Tap the chevron (>) on the right of a focused row to open the page for that item.
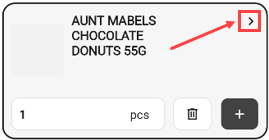
This lets you verify you added the right item. Tapping anywhere else on the row body does not open Item details.
Step buttons
The expanded controls depend on the current quantity:
When the quantity is 1, a trash icon sits on the left and a + icon on the right. Tap + to bump the quantity (1 → 2). Tap the trash icon to remove the row. See Removing an item below.
When the quantity is 2 or more, the left control becomes −. Tap − to step down by 1; when the count drops to 1, the button switches back to trash so the next tap removes the row.
Press and hold − or + to step the value continuously.
Quantity field
Tap the quantity field to open the numeric keyboard. The field is outlined with a thick border while the keyboard is open. The value is saved when you tap Done, scroll the list, drag the keyboard shut, or tap outside the field.
Invalid characters - spaces, minus signs, letters - are stripped as you type; there is no error message.
Commas (as a decimal separator) are accepted on weight items, and on non-weight items when the “AllowDecimalValueInPieces” configuration parameter is enabled in back-office.
Ingredient items
Some items are configured as ingredient items in the back-office. An ingredient item is built from a base ingredient and a quantity per unit — for example, Hot dog buns 4x12 pcs is a supplier package of 4 that contains 12 inner Hot dog bun units per pack (48 buns total).
Ingredient items only affect the user interface in Stocktaking and Breakage — the only two transactions that ask for separate supplier-pack and inner-unit counts.
In those two transactions:
Dual quantity input. Where the transaction normally asks for one quantity, it asks for two instead - Supplier packages (whole packs) and Inner units (loose pieces from within a pack). Either one or both can be filled. The label on the Inner units field shows the pack breakdown in parentheses (for example, “Inner units (12 x Hot dog bun sesame)”).
Weight items (sales unit kg and similar) are not ingredient items even if they look similar — they always show a single quantity field.Decimal display on rows. On the transaction page, an ingredient item’s row shows a single quantity in the supplier-package unit; if inner units are also filled, the figure is a decimal (for example, 4 supplier packages and 9 inner units of a 12-pack item display as 4,75 pcs).
The exact layout of the dual-field input is described on the Stocktaking and Stock transactions pages.
All other transactions show a single quantity field even when the item is an ingredient item.
Removing an item
Tapping the trash icon  on a row removes the item and it disappears immediately from the cart.
The more menu
The … button in the header opens the transaction options bottom sheet.

These options appear in every transaction:
Add quick action — adds this transaction to the Quick actions section on the Home screen.
Put on hold - pauses the transaction. See Putting a transaction on hold below.
Discard transaction - ends the transaction. See Discarding a transaction below.
Transactions that show a Total row also include Hide total (toggling to Show total when the total is already hidden).
Transactions that have a user-chosen name include Edit <name>. See Editing the name below. Individual transactions may add their own options, described on that transaction’s page.
Tap the X or tap outside the sheet to close it without choosing.
Editing the name
Transactions that have a user-chosen name let you rename them mid-flow.
Choose the rename option (for example, Edit item list name) from the more menu. The Edit name sheet opens with the current name pre-filled.
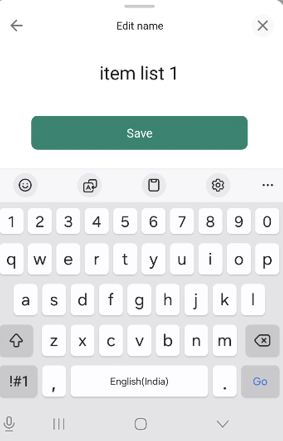
Change the name. Save is disabled while the field is empty.
Tap Save to apply the new name, or the X to close without saving.
Putting a transaction on hold
Putting a transaction on hold pauses it so you can resume it later from the In progress section of the Home screen.
Choose Put on hold from the more menu. A confirmation popup opens with the message “The process can be resumed later.”
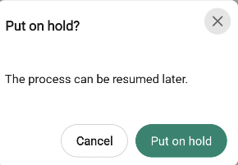
Tap Put on hold to pause and leave the page.
Tap Cancel to stay on the page.
Discarding a transaction
Discarding ends the transaction and takes you out of the flow. The exact effect varies — for transactions that exist only while you are working on them (like an Item list or Purchase order).
Discard deletes the transaction; for transactions that work against a persistent entity (like a stocktaking against a count group) discard resets your in-progress changes and leaves the entity in place.
Choose Discard transaction from the more menu. A confirmation popup opens. The popup message is transaction-specific (for example, “This action cannot be undone.” or “All items will be marked as ‘Not counted’.”).
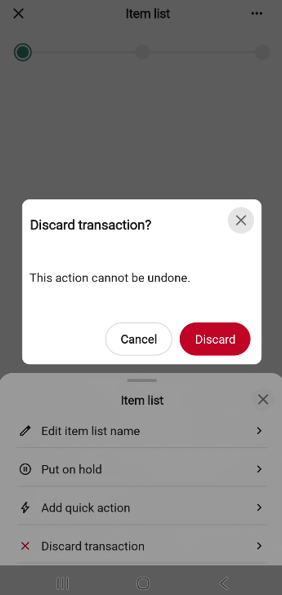
Tap Discard to confirm and leave the page.
Tap Cancel to stay on the page.
Resuming a paused transaction
If a transaction of the same type is already paused when you start a new one, the app asks whether to resume it.
Tap Resume to reopen the paused transaction with its data intact.
Tap Discard to delete the paused one. A confirmation asks you to tap Discard again to confirm or Cancel to go back. After discarding, the new transaction starts.
Tap Cancel on the resume prompt to leave the paused transaction untouched and return to the previous screen without starting a new one.
The finish page
The finish page is the second-to-last step of most transactions. It lets you review the transaction before submitting it.
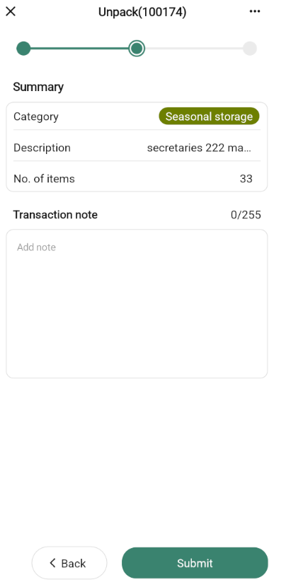
It shares the standard header and progress bar, and has:
A Summary section listing the key details of the transaction (for example, supplier, item count, total). Rows with a chevron on the right are editable — tap them to change the value before submitting.
An optional free-text field below the summary (labelled Add note, Add description, and so on) for a free-text comment that is saved with the transaction.
A bottom bar with a Back button on the left (returns to the previous step) and a Submit button on the right (finishes the transaction).
Some transactions also show a dismissible information banner at the top of the page when a condition applies. Tap the X on the banner to hide it.
Individual transactions list their own summary rows and note-field label on the transaction’s own page.
The done page
After you submit a transaction, the done page confirms it succeeded. The progress bar is fully filled.
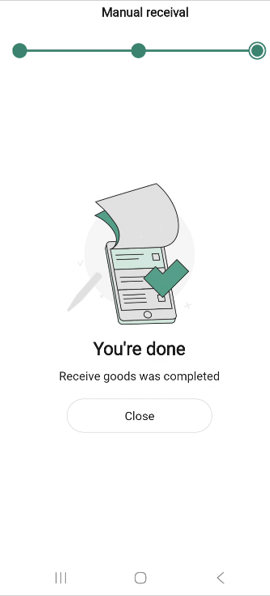
The page shows an illustration, the heading You’re done, and a transaction-specific confirmation message (for example, “The item list was created”). The page closes automatically after a few seconds and returns you to the Home screen.
Tap Close at the bottom to return to the Home screen immediately.